


RD-VH7/X-VH7 (EN)
11
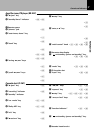
System configuration, Installation
When the components are to be installed horizontally for stacking, be sure to use the spacer for stacked
installation which is provided with each component unit.
The front feet attached at the factory to each component unit of this series can be replaced with the pro-
vided replacement feet.
Installation accessories and installation precautions
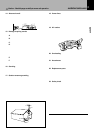
Replacement front feet ............ 2 with each unit
Spacer for stacked installation
................................. 1 with DM-VH7 and X-VH7
Allen wrench .............................1 with each unit
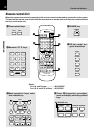
Changing the installation method
Installation
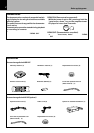
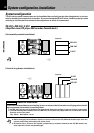
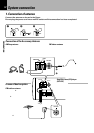
Horizontal, stacked installation
Use the provided spacer for horizontal installa-
tion.
1Attach the spacer by inserting its claws into
the spacer mount holes on the rear of the
DM-VH7/X-VH7.
CAUTION When inserting the claws, align them
with the holes by tilting the spacer slightly (about 20
degrees) as shown in the illustration.
2Arrange the cords by winding them around
the spacer.
The audio cords and system control cord can be ac-
commodated into the trench on the spacer by wind-
ing them as shown in the illustration.
3Stack the component on this unit by align-
ing the feet of the upper component with
the foot support cavities on the spacer.
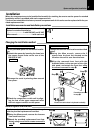
How to replace the front feet
The factory-attached front feet can be exchanged
with the provided replacement front feet.
1Using the Allen wrench, remove the 4 screws
from each front foot.
2Attach the provided replacement front feet.
Attach using
two of the 4 screws removed in
step 1.
Vertical installation
Change the left front foot location as described
below.
1Using the Allen wrench, remove the 2
screws from the front foot located on the
left when the unit is seen from the front.
2Align the removed front foot with the
threaded holes on the rear part of the right
side panel, and attach the front foot
using
the screws removed in step 1.
Front feet removed
in step 1
Step 1
Threaded holes
Step 2
View of the unit when it is placed vertically
Step 1
Step 2
÷ Only the front feet can be replaced.
÷ When attaching replacement front feet, use only
the screws which have been used with the re-
moved feet. (Using other screws may result in a
fire or malfunction.)
÷ Eject the CD, MD and/or tape and unplug the
power cord before installation.
Notes
Notes
PREPARATION