


Page 3© 2002/2003 bel canto design, Ltd. PRePro User’s Guide rev1103
Recommendations
BEFORE you begin setting up the PRePro, we
strongly recommend that you take a moment
to:
• Familiarize yourself with the Controls and
Functions of the unit
• Carefully study the System Connection and
Basic Operational instructions
• Understand the System Setup and
Programming instructions
• Take note of the listed Precautions
LISTENING RECOMMENDATIONS
Please note that your new PRePro will
improve sonically over the course of the first
week. After the first week, you will notice
that the sound of your new product has
become richer, warmer and more open!
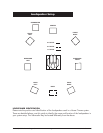
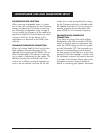
Please follow these guidelines for placement
of your PRePRo. This will insure ease of use
and long, reliable operation:
• Place the PRePro so that the front panel
TFT display can be seen easily. The TFT dis-
play is best viewed no more than 15° to
either side of its axis and no more than 30°
above or 10° below axis.
• Keep the PRePro away from heat sources
such as air ducts or radiators.
• Leave at least 1" of space on all sides and
the top. This is to insure that the PRePro will
not overheat.
• If you wish to mount the PRePro within a
rack system there are rack adapters avail-
able for this purpose. Please contact Bel
Canto Design or your dealer for information.
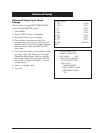
Placement Guidelines
AC Connecti AC Connection and Power
The PRePro will have its voltage set internal-
ly for your region’s power, insure that this is
correctly indicated. Plug the supplied
power cord into an AC outlet that is always
live (unswitched). The PRePro will not oper-
ate properly if it’s plugged in to an AC out-
let that might be switched off. Use the front
panel master power button to turn the AC
power on to the unit. The only time you
might want to use the AC Power switch
again is if you plan to be away for an
extended time or if you need to do a sys-
tem reset after a power surge or power out-
age. Note: Do not turn off the AC Power
switch or unplug either end of the AC cord
before the PRePro has first been turned off
by the remote control or front panel On-Off
button!
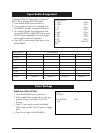
Quick Setup
After making all component connections as
described in HARDWARE SET UP install
power cord to PRePro. Press the master
power button on the left side of the front
panel. Press any input select button on the
left side of panel (example DVD) to turn
PRePro on.
Press the MENU button on the remote con-
trol or the MENU button on the front panel
to the right of the screen. The main menu
will appear on the front panel monitor.