


ISM4 INSTALLATION & PROGRAMMING MANUAL
21
Delay – with additional Command Structures in the Macro
13. To add a delay after the IR Command in Command Structure 1, after Step 5, press the Delay Button. The
ISM4 will respond by entering DELAY Learn Mode and the Program LED will flash once.
14. Press the Next Button once for each second of Delay to be added to the Command Structure. Press the
Prev Button once for each second of Delay to be subtracted.
NOTE: The first press of the Next Button will add one second of delay. Each additional press will add one
second up to 60 seconds after which the timer will reset to 0 seconds. The first press of the Prev Button will
add 60 seconds of delay. Each additional press will subtract one second down to 0 seconds after which the
timer will reset to 60 seconds.
No Delay – no additional Command Structures in the Macro
15. If there are no additional Command Structures in the Source 1 ON Macro, press "Next" for 2 seconds
(Indicated by the first blink of the Active Source LED). The ISM4 will shift to the Source 1 OFF Macro,
Command Structure 1. (Source LED solid green, Program LED solid red.)
NOTE: A 2 second press of the Prev Button (Indicated by the first blink of the Active Source LED) will shift
programming to the previous Macro. (i.e. a 2 second press of the Prev Button while in Source 1 ON Edit
Mode, will shift Edit Mode to the Source 4 OFF Macro. (Source 4 LED solid green, Program LED orange.)
Test Macro
16. When all Command Structures within a Source ON or OFF Macro have been programmed, tested and
saved, the complete Macro can be tested by pressing the Test Button.
NOTE 1: If the IR Commands and Delays within the Command Structures were not properly saved, the Macro
cannot be tested and the Program LED will flash red to indicate error.
NOTE 2: To Test a Macro starting from Normal Operation Mode, Press Sequence for 2 seconds (Indicated by
the first blink of the Active Source LED) to enter Edit Mode, (Source 1 and Program LED’s green), Navigate to
the Macro to be tested (2 second press of Prev or Next) and then press the Test Button.
Program Remaining Macros
17. Navigate to the next Source ON or OFF Macro to be programmed. From the Source 1 ON Macro, press the
Next Button for 2 seconds (Indicated by the first blink of the Active Source LED). The ISM4 will shift to the
Source 1 OFF Macro; Command Structure 1. (Source LED solid green, Program LED solid orange.)
NOTE: A 2 second press of the Prev Button (Indicated by the first blink of the Active Source LED) will shift
programming to the previous Macro. (i.e. a 2 second press of the Prev Button while in Source 1 ON Edit
Mode, will shift Edit Mode to the Source 4 OFF Macro. (Source 4 LED solid green, Program LED red.)
18. Repeat Steps 2-17 above until all Source ON and OFF Macros have been programmed, tested and saved. It
is vitally important to program both the Source ON and OFF Macros. The ISM4 will not function properly if
both sets of Macros have not been programmed.
Exit Edit Mode
19. To exit Edit Mode, at any time during Edit Mode, press the Prev Button for 10 seconds (Indicated by the
third blink of the Active Source LED). The ISM4 will return to Normal Operating Mode.
Test ISM4 (All Macros)
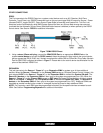
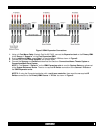
NOTE: All system devices and components must be properly setup and connected to test ISM4 Macro
Programming. Be sure all Sensors are connected to the appropriate device and Source Sense Inputs on the
ISM4, and be sure all IR Emitters are connected to the appropriate Source “IR Out “on the ISM4 and attached to
the correct device over the IR eye for that device.
20. With all Sources OFF, turn the System Reference Device (Source 1) ON. All Sources should turn ON and
any additional setup programming (source select, play, etc) should execute as programmed. If any functions
were ‘missed’, test the individual ON Macro for that Source. Re-learn IR Commands and adjust delays as
necessary until the system powers up correctly.
21. Repeat Step 20 for System OFF. (Turn the System Reference Device, Source 1, OFF).