


6
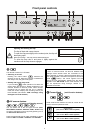
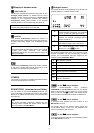
Adjusting screen brightness
The brightness of the alpha-numeric lines of the screen
can be set to suit your personal preference by repeatedly
pressing the
button. Three brightness levels are
available:
1. Normal setting:
DISP
DISPDISP
DISP NORM
NORM NORM
NORM
clearly legible, even in sunlight
2. Darker setting:
DISP SOFT
DISP SOFTDISP SOFT
DISP SOFT
subdued setting, for dark locations
3. Display off:
DISP OFF
DISP OFFDISP OFF
DISP OFF
the screen is completely switched off
If you set brightness level 3, the screen switches briefly
to normal brightness every time you give a command, so
that you can check the settings easily even from a
distance. After about four seconds the screen
automatically switches back to your preferred brightness
level. If you change the brightness level, this also means
that the new value only becomes effective after about
four seconds.
If Loudspeaker A is on:
Switches from surround mode to stereo mode and vice
versa.
If Loudspeaker A is off:
Briefly pressing the
button displays the current
Dolby Headphone mode. Every time you press the
button again, you cycle through to the next Dolby
Headphone room type ('
PH
PHPH
PH
DH-1
DH-1 DH-1
DH-1
', '
PH
PHPH
PH
DH-2
DH-2 DH-2
DH-2
', '
PH
PHPH
PH
DH-3
DH-3 DH-3
DH-3
').
Holding the
button pressed in switches back
from the Dolby Headphone room types to stereo mode
('
PH
PHPH
PH STEREO
STEREO STEREO
STEREO
').
For more information on Dolby Headphone please see
the section entitled 'Dolby Headphone'.
–
+
The decoder features a digital volume control: every time
you press one of the volume buttons the volume
increases
or decreases
by 1.5 dB.
If you hold one of the volume buttons pressed in for
longer than a second, the volume continues to rise or fall
until you release the button again.
The screen displays '
VOLUME
VOLUMEVOLUME
VOLUME
' briefly.
Note:
The volume and tone controls of the decoder are
completely independent of the corresponding controls on
your stereo pre-amplifier. This allows you to select
the optimum volume setting for each mode.
DIGITAL OUTPUT
Digital recording output (optical), designed for connecting
a digital recorder temporarily (e. g. for transferring
material to a portable MD recorder).
The signal of the source you last listened to is present at
this output as a stereo signal (also where the input signal
is Dolby Digital or dts). Dolby Headphone mode must be
switched off during the recording.
DIGITAL INPUT 6
Digital input (optical), designed for connecting a digital
sound source (e. g. MD recorder) temporarily.
CAM INPUT
(VIDEO and AUDIO CINCH)
Video input and stereo sound input for temporary
connection of an additional AV source device (e. g.
camcorder).
MIC
This socket is for the measuring microphone when you
are using an automatic loudspeaker calibration process
(see the section entitled 'Auto Setup').
CAM
Source select button for the CAM input.
(Select recording source)
Hold the
button pressed in to switch recording
sources; briefly pressing a source button (
,
, ...) then selects the recording source you wish to
use. The current recording source is displayed on the
screen while you press the button.
For more information on recording, especially in Multi-
Room mode, please read the chapter 'Recording with
the SR 1535 R'.