


5
B MD recording
Recording an MD right
away! (Synchro-
recording)
See the illustrations in English text (pages 16
and 17).
This section explains the basic procedure for
making digital recordings using an optical cable
connected to a CD player, BS tuner or other
digital equipment. The recorder starts and stops
recording in sync with the source sound. Track
marks are added whenever they appear in the
sound source. It is recommended to use the AC
power adaptor when recording.
To record from a cassette deck, radio, etc.
t“Recording in analog (Analog Recording)”
(page 8)
To record using a group mode t “Recording
tracks using the group function (Group Mode
Recording)” (page 9)
1 Insert an MD.
1Press OPEN to open the lid.
2Insert an MD with the label side
facing front, and press the lid to
close.
Insert an recordable MD when
recording.
2 Make connections. (Insert the cables
firmly and completely into the
appropriate jacks.)
1Connect the LINE IN (OPT) jack of
recorder to the digital (optical) out
jacks of the source with a optical
cable.
The recorder switches to digital
input automatically.
2Connect the DC IN 3V jack of the
recorder to a wall outlet with the AC
power adaptor.
When the recorder has different sound
sources connected at the same time, the
recorder switches to the digital,
microphone, or analog input in this
order of priority.
3 Record an MD.
1While the recorder is stopped, press
the jog dial.
2Turn the jog dial until “SYNC REC”
flashes in the display, and then press
to enter.
3Turn the jog dial until “SYNC ON”
flashes in the display, and then press
to enter.
To cancel synchro-recording, select
“SYNC OFF” in this step.
4Press and slide REC to the right.
“REC” and REC lamp on the REC
switch light up and recording starts.
5Play the source you want to record.
To stop recording, press x.
After you press x to stop, the recorder will
automatically turn off in about 10 seconds
(when using batteries) or about 3 minutes
(when using AC power adaptor).
Note
If you record on a previously recorded disc, the
recorder is factory set to overwrite the entire
contents of the disc. If you want the recording
to start after the existing contents, do the
procedure “Recording without overwriting
existing material” (page 10) before step 3,
“Record an MD.” (this page).
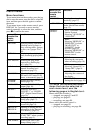
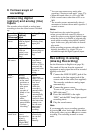
To Do this
Record from the
end of the
current
contents
1)
1)
If “REC-Posi” is set to “From End”, recording
operations will always start from the end of
the previously recorded material without
pressing END SEARCH.
If “REC-Posi” is set to
“From Here”, press END
SEARCH, and then press and
slide REC to the right.
If “REC-Posi” is set to
“From End”, press and slide
REC to the right.
Record over
partway through
the previous
recording
Press N, >, or . to
find the start point of
recording and press x to
stop. Then press and slide
REC to the right.
Pause Press X.
2)
Press X again to resume
recording.
Remove the MD Press x, then press OPEN to
open the lid.
3)