


10
HCD-PX333
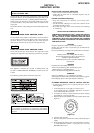
Note 1:About “R”
As this unit has only a few buttons, some operations require the use of remote commander (RM-S55EN/provided with unit: 1-476-664-21)
buttons. These operations are indicated as “R” in this manual.
Example: MENU/NO “R” ... Press the [MENU/NO] button of the remote commander.
Note 2:Incorrect operations may be performed if the MD test mode is not entered properly.
In this case, press the ?/1 button to turn the power off, and retry to enter the MD test mode.
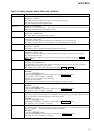
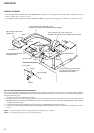
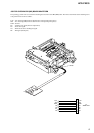
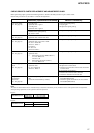
IOP DATA RECORDING AND DISPLAY WHEN OPTICAL PICK-UP AND NON-VOLATILE MEMORY (IC195 OF BD
(MD) BOARD) ARE REPLACED
The IOP value labeled on the optical pick-up can be recorded in the non-volatile memory. By recording the value, it will eliminate the need
to look at the value on the label of the optical pick-up. When replacing the optical pick-up or non-volatile memory (IC195 of BD (MD)
board), record the IOP value on the optical pick-up according to the following procedure.
Record Procedure:
1. Press the ?/1 button to turn the power on.
2. Press the [FUNCTION] button to set the MD function.
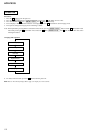
3. Press three buttons of [ TUNING+], [REC MODE], and .m (MD) simultaneously to enter the MD test mode and display
“[Check]”.
4. Press the . “R” or > “R” button to display “[Service]”.
5. Press the ENTER/YES “R” button to display “AUTO CHECK”, and press the > “R” button to display “Iop Write”.
6. Press the ENTER/YES “R” button.
7. The display becomes “Ref= @@@.@” (@ is an arbitrary number) and the numbers which can be changed will blink.
8. Input the IOP value written on the optical pick-up.
To select the number : Press the . “R” or > “R” button.
To select the digit : Press the [REC MODE] button after press the [CD SYNC NORMAL] button to display “IT”.
9. When the ENTER/YES “R” button is pressed, the display becomes “Measu=@@@.@” (@ is an arbitrary number).
10. As the adjustment results are recorded for the step 9 value. Leave it as it is and press the ENTER/YES “R” button.
11. “Complete!” will be displayed momentarily. The value will be recorded in the non-volatile memory and the display will become “Iop
Write”.
12. Press the [REPEAT STEREO/MONO] button to complete. “Initialize” will be displayed and release the MD test mode.
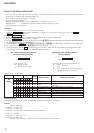
Display Precedure:
1. Press the ?/1 button to turn the power on.
2. Press the [FUNCTION] button to set the MD function.
3. Press three buttons of [ TUNING+], [REC MODE], and .m (MD) simultaneously to enter the MD test mode and display
“[Check]”.
4. Press the . “R” or > “R” button to display “[Service]”.
5. Press the ENTER/YES “R” button to display “AUTO CHECK”, and press the > “R” button to display “Iop Read”.
6. Press the ENTER/YES “R” button.
7. “@@.@/##.#” is displayed and the recorded contents are displayed.
@@.@ : Indicates the Iop value labeled on the pick-up.
##.# : Indicates the Iop value after adjustment.
8. Press the [REPEAT STEREO/MONO] button to complete. “Initialize” will be displayed and release the MD test mode.
WHEN MEMORY NG IS DISPLAYED
If the nonvolatile memory data is abnormal, “E001 MEMORY NG” will be displayed so that the MD deck does not continue operations. In
this case, set the test mode promptly and perform the following procedure.
Procedure:
1. Enter the MD test mode.
2. Normally a message for selecting the test mode will be displayed. However if the nonvolatile memory is abnormal, the following will be
displayed “INIT EEP?”.
3. Press the x (MD) and Z (MD) buttons simultaneously.
4. Press the . “R” or > “R” button to display “MDM-7X2A”.
5. Press the ENTER/YES “R” button. If the nonvolatile memory is successfully overwritten, the normal MD test mode will be set and a
message to select the MD test mode will be displayed.
M>
M>