


Basic Operation Lexicon
2-4
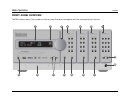
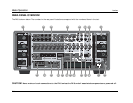
FRONT-PANEL OVERVIEW (continued)
4 MAIN ZONE INPUT SELECTION BUTTONS
Selects the corresponding input in the Main Zone. When an input is
selected, a blue LED lights on the corresponding input selection
button. When the Main Zone is deactivated, pressing a Main Zone
input selection button activates the corresponding input in the
Main Zone. Zone 2 and Zone 3 remain deactivated until a Zone 2
or Zone 3 input is selected.
5 ZONE 2 INPUT SELECTION BUTTONS
Selects the corresponding input in Zone 2. When an input is
selected, an amber LED lights on the corresponding input selection
button. When Zone 2 is deactivated, pressing a Zone 2 input
selection button activates the corresponding input in Zone 2. The
Main Zone and Zone 3 remain deactivated until a Main Zone or
Zone 3 input is selected.
6 ZONE 3 INPUT SELECTION BUTTONS
Selects the corresponding input in Zone 3. When an input is
selected, a red LED lights on the corresponding input selection
button. When Zone 3 is deactivated, pressing a Zone 3 input
selection button activates the corresponding input in Zone 3. The
Main Zone and Zone 2 remain deactivated until a Main Zone or
Zone 2 input is selected.
7 TUNER SELECTION BUTTONS
Tuner selection buttons allow for direct entry of station frequencies,
selection of AM or FM broadcast bands and the saving/recalling of
presets. See “Tuner Overview” on page 2-10 for additional
information.
8 STANDBY BUTTON
Toggles the RV-8 between on and standby. When the RV-8 is
powered on, pressing this button places the RV-8 into standby and
lights the red LED on the button. Power is supplied to the RV-8
when in standby. When the RV-8 is in standby, pressing the button
turns the unit on and activates all zones that were active in the
previous operating session.
In the event of a power outage, the RV-8 will display a BROWN
OUT!! PRESS STANDBY message. To turn the unit on, use the
STANDBY button. For more information, see “POWER
MANAGEMENT” on page 3-3.
9 CHANNEL STATUS LEDs
Each amplifier channel has a blue LED on the front panel that is
illuminated when the unit is powered on. If there is a problem with
an amplifier channel, the corresponding LED will turn off. See
“Amplifier Overview” on page 2-13 for additional information.
10 MODE and BUTTONS
Use the Mode buttons to scroll to the previous () or next ()
available listening mode. Scrolling occurs in the order shown in the
MODE ADJUST menu. Refer to “Listening Mode Activation” on
page 6-2 for more information.