


89
Removing a zone set
Removing a zone set from the database affects the member zones in the following ways:
• Member zones that are members of other zone sets are not affected.
• Member zones that are not members of other zone sets become members of the orphan zone set. The
orphan zone set is saved on the switch module.
Complete the following steps to remove a zone set from the database:
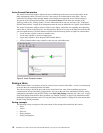
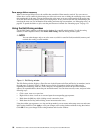
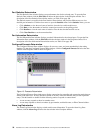
1. In the Faceplate window, click
Zoning / Edit Zoning.
The Edit Zoning window opens.
2. In the Zone Sets tree, select the zone set to be removed.
3. Click
Edit / Remove to remove the zone set.
4. Click
Apply to save changes to the zoning database.
✏ NOTE
You can use shortcut menus to remove a zone set from the database.
Removing all zoning definitions
To remove all zone and zone set definitions from the zoning database, use one of the following methods:
• Click
Edit / Remove All. In the Remove All window, click Yes to confirm that you want to delete all
zones and zone sets.
• Right-click the
Zone Sets heading at the top of the Zone Sets tree, and select Clear Zoning from
the pop-up menu. Click Yes
to confirm that you want to delete all zone sets and zones.
Managing zones
Managing zones involves the following tasks:
• Creating a zone in a zone set
• Adding zone members
• Renaming a zone or a zone set
• Removing a zone member
• Removing a zone from a zone set
• Removing a zone from all zone sets
• Changing zone types
✏ NOTE
Changes that you make to the zoning database are limited to the managed switch module and do not
propagate to the rest of the fabric. To distribute changes to configured zone sets fabric-wide, you must
edit the zoning databases on the individual switch modules.
Creating a zone in a zone set
When a zone is created, its zone type is soft. To change the zone type to a hard zone, see “Changing zone
types” on page 91 for more information. See “Zones” on page 83 for information on zone types (soft and
hard). Complete the following steps to create a zone in a zone set:
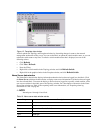
1. In the Faceplate window, click
Zoning / Edit Zoning.
The Edit Zoning window opens.
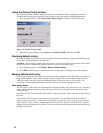
2. Click
Edit / Create a Zone.
The Create a Zone window opens.
3. Type a name for the new zone and click
OK. The new zone name is displayed in the Zone Sets
window.