


35
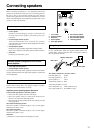
Connecting the included antennas
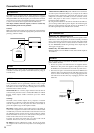
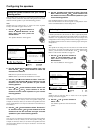
Connecting the FM indoor antenna:
The FM indoor antenna is for indoor use only. During use, extend the
antenna and adjust its orientation until the clearest signal is received.
Fix it with push pins or similar items in the position that will cause
the least amount of distortion.
If the reception is not very clear with the attached FM indoor
antenna, the use of an outdoor antenna is recommended.
Connecting the AM loop antenna:
The AM loop antenna is for indoor use only. Set it in the direction
and position where you receive the clearest sound. Put it as far away
as possible from the DTR-6.3/5.3, televisions, speaker cables, and
power cords.
If the reception is not very clear with the attached AM indoor
antenna, the use of an outdoor antenna is recommended.
Hint:
Either of the split ends of the AM antenna can be connected to either
terminal. Unlike speaker cabling, there is no polarity for AM
broadcast signals.
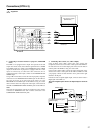
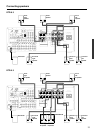
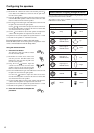
COAXIAL
OPTICAL
1
2
IN
IN
IN
OUT
OUT
DIGITAL INPUT
VIDEO 2
VIDEO 3
OPTICAL
COAXIAL
DIGITAL
INPUT
IN
OUT
IN
DIGITAL
OUTPUT
IN
L
R
PHONO IN
O
U
O
U
ANTENNA
FM
75
AM
IR OUT
56K
A
40K
B
ZONE 2
OUT
DC IN
24V 1A
12 V
TRIGGER
OUT
RS232
L
R
ZONE 2
LINE OUT
A
B
ZONE 2
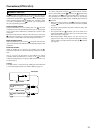
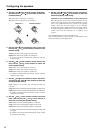
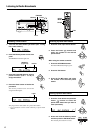
Strip away the insulation
from the end of the cable,
and fully insert the stripped
end of the cable.
(Indoor)
AM loop antenna
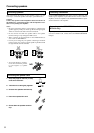
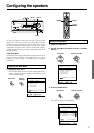
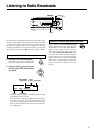
Connecting antennas
Insert into the hole.
FM antenna
To use the tuner of the DTR-6.3/5.3, it is necessary to prepare the
supplied FM and AM antennas.
• Adjustment and placement of the FM and AM antennas for
better reception must be done while listening to a station
broadcast.
• If better reception cannot be obtained, then placement of an
outside antenna is recommended.
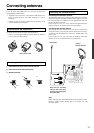
Assembling the AM loop antenna
Assemble the loop antenna as shown in the illustration.
• Refer to “Connecting the AM loop antenna” below for details on
how to connect the loop antenna.
Connecting the AM antenna cable
1. Press down the lever at the antenna terminal.
2. Insert the wire into the terminal hole.
3. Release the lever.
12
3