9
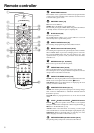
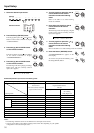
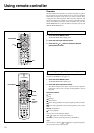
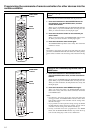
Remote controller
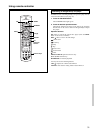
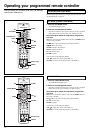
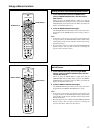
INPUT SELECTOR buttons [25]
Selects an input source.
Same as the input selector buttons on front panel of the DTR-5.2.
The input source for each buttons is given here. DVD:DVD, CD:CD,
V1:VIDEO1, V2:VIDEO2, V3:VIDEO3, V4:Not used with the
DTR-5.2, T1:TAPE, T2:Not used with the DTR-5.2, TUN:FM/AM,
PH:PHONO.
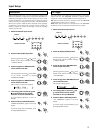
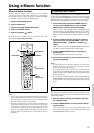
Numeric key/Listening mode selector/SP A, B/
Re-EQ/DISPLAY/DIMMER buttons
1 to 9, +10, --/---, 0: For entering the number of a track.
STEREO, DIRECT, DSP
/ , SURR, A.ST: You can select a
listening mode. [25]
STEREO: Changes the listening mode directly to the Stereo
listening mode. If pressed, the listening mode for the selected
input source set in the Listening Mode Preset is also changed to
the Stereo listening mode.
SURR (Surround): Changes the listening mode to the surround
mode for the current input signal (e.g., Dolby Pro Logic II,
Dolby Digital, or DTS). If pressed, the listening mode for the
selected input source set in the Listening Mode Preset is also
changed to the Surround listening mode.
For Dolby Pro Logic II, this button also changes the mode
between Dolby Pro Logic II Movie and Dolby Pro Logic II
Music.
DIRECT: Changes the listening mode directly to the Direct
listening mode. If pressed, the listening mode for the selected
input source set in the Listening Mode Preset is also changed to
the Direct listening mode.
A.ST (All Channel Stereo): Changes the listening mode
directly to the Stereo listening mode. If pressed, the listening
mode for the selected input source set in the Listening Mode
Preset is also changed to the All Channel Stereo listening mode.
DSP
/ : Changes the listening mode as shown below.
Direct ↔ Stereo ↔ Surround ↔ Orchestra ↔ Unplugged ↔
Studio-Mix ↔ TV Logic ↔ All Ch Stereo ↔ Direct.
If pressed, the listening mode for the selected input source set in
the Listening Mode Preset is also changed.
Re-EQ: Depending on the listening mode, you can turn the cinema
re-equalization function on or off. [25]
Re-EQ (re-equalization) takes the edginess or “brightness” out of
your home cinema sound to compensate for the fact that sound
mixed for theaters may sound too bright when played back through
speakers in the home environment.
On: Select to turn on the re-equalization filter.
Off: Select to turn off the re-equalization filter.
Note:
The Re-EQ function is effective on the Dolby Pro Logic II Movie
and Dolby Digital modes.
SP A, SP B: For turning on and off speakers systems A and B. [26]
DISPLAY: For changing the display in the front display. [26]
DIMMER: Adjusts the display brightness.
There are three settings available: normal, dark and very dark.
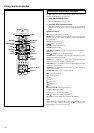
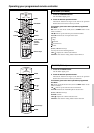
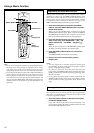
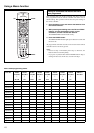
LIGHT button
For illuminating the buttons of the remote controller.
This is button is useful when using the remote controller in dark
locations. When pressed, the buttons on the remote controller light
green.
The button for the mode currently selected lights brighter than the
rest.
MODE MACRO button [45]
For executing and programming the Macro function.
SETUP button [21, 22, 29-32]
Press to enter and exit the setup mode.
ENTER/cursor button [21, 22, 29-32]
For selecting and entering settings in the setup mode.
VOL button
For adjusting the volume.
TEST/MENU button
TEST: Outputs a test tone for setting speaker levels.
Use this button in conjunction with the LEVEL / and CH SEL
buttons to calibrate the speakers levels.
1. Press the TEST button.
A test sound (pink noise) will be heard from the left front
speaker. At this point, it is not necessary to adjust the volume of
the test sound.
2. Press the CH SEL button.
The test sound will now be heard from a different speaker.
3. Use the LEVEL
/ buttons to adjust the volume of the test
sound from this speaker to the same level that you heard
from the previous speaker.
4. Repeat the procedure in step 2 and 3 until the volume of the
test sound from all speakers is the same level.
Each time you press the CH SEL button, the test sound will be
heard from a different speaker. The speaker order for calibration
is front left → center → front right → surround right → surround
left → subwoofer.
5. Press the TEST button to exit the setting.
For a more detailed explanation of how to calibrate the speaker
levels, see page 22.
MENU: When in the DVD mode, this button displays the DVD
menu.
MUTING/M button [26]
Activates the mute function.
ZONE 2/SEARCH/ENTER button
ZONE 2: Not used with the DTR-5.2.
SEARCH: When in the DVD mode, for finding the specific section
on a disc where you want to start playback.
ENTER: When in the MD mode, for confirming the selection.