


18
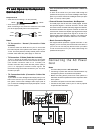
After you have connected all 6 speakers to the main unit and
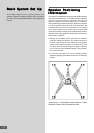
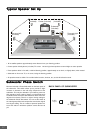
positioned the speakers as described on the previous page,
the next step is to adjust the sound level of each of the 5
satellites, using the Test Tone, so that the level at your normal
listening position seems to be the same. This adjustment should
be made with the Test Tone only, not while you are watching a
DVD movie. Remember that most of the action and dialog in a
movie will occur in front of you and the sound will come from
the 3 front satellites and the subwoofer. The rear speakers are
designed to operate only when there is some action or special
sound effects taking place behind you. If you adjust the level
of the two rear speakers incorrectly so that you constantly hear
sound behind you, you will not get the proper surround effect.
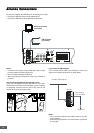
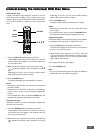
• Press the POWER button on the front panel to turn the
system ON. The unit will go into the Standby mode.
• Sit in your normal listening position and press the STANDBY
button on the remote control. The unit will go into the Active
mode and the main display will come on and show "NO
DISC".
• Turn on your TV. If necessary adjust your TV to select the
source which is connected to the Video In (or S-Video In)
jack, depending on which jack you used to connect this
system to your TV. The Emerson DVD logo screen should
appear on your TV together with the words "NO DISC".
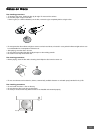
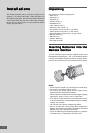
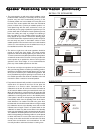
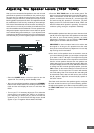
1 Press the TEST TONE button on the remote control. The
test tone sound signal will start at the front right (FR) speaker.
After 3 seconds the sound will move to the center (C)
speaker, and then to the front left (FL), surround right (SR)
and surround left (SL) speakers in succession. The main
display and the TV screen will show the word "TEST" and
will also indicate which speaker is operating. The test tone
continues cycling among the 5 speakers indefinitely.
2 All 5 satellite speakers have been pre-set to the same level
(00 db). If the tone signal from all 5 speakers sounds about
the same at your normal listening position, no further
adjustment is necessary. You can press the TEST TONE
button again to cancel the test tone function.
IMPORTANT: It does not matter how loud or soft the test
tone signal is. As long as all 5 speakers have the same
level you do not need to make any adjustment. You can skip
step 3 and go to the next section.
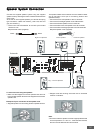
3 If the level of all 5 speakers does not sound the same at
your normal listening position you can adjust each speaker
up or down 10 db in 1 db steps. For example let's say that
the test tone from the two surround speakers sounds lower
than the 3 front speakers because the rear speakers are
further away from your normal listening position. When the
front panel display and the TV screen indicate that the tone
is coming from the surround right (SR) speaker, press the
VOL + button on the remote control to increase the level of
that speaker. The front panel and TV screen will show the
new level setting. After a few seconds the new setting will
be memorized and the test tone will move to the surround
left (SL) speaker. Adjust the surround left (SL) speaker in
the same manner.
Then listen to the tone from all 5 speakers again to verify that
the level sounds the same at your normal listening position.
Re-adjust each speaker up or down as required and the press
the TEST TONE button once more to cancel the test tone
function.
Adjusting The Speaker Levels (TEST TONE)Adjusting The Speaker Levels (TEST TONE)
Adjusting The Speaker Levels (TEST TONE)Adjusting The Speaker Levels (TEST TONE)
Adjusting The Speaker Levels (TEST TONE)
SUB
TITLE
DVD TUNER AU X
LANGUAGE TITLE RETURN
ANGLEGO TO
MENU
AUDIO1
DISPLAY
23
456
789
>10 0
N/P
ADJ/VOL
SETUP
ENTER
STOP
PLAY/PAUSE
STEP
A-B REPEAT
SLOW
PROG. SELECT
STA
-
STA
+
TUN TUN
+
ST/MO
MEMO
+
ZOOM
SLEEP MUTE
OPEN/
CLOSE
LI STEN ING
TEST
TONE
STANDBY
-
+
ADJ/VOL +
ADJ/VOL - POWER
SELECT
SELECT
TEST TONE
ADJ/VOL +/-
STANDBY