124
NOTE
• Insert the specified batteries in the remote control
unit.
• Replace the batteries with new ones if the set
does not operate even when the remote control
unit is operated close to the unit. (The supplied
batteries are only for verifying operation.)
• When inserting the batteries, be sure to do so in
the proper direction, following the q and w marks
in the battery compartment.
• To prevent damage or leakage of battery fluid:
• Do not use a new battery together with an old
one.
• Do not use two different types of batteries.
• Do not attempt to charge dry batteries.
• Do not short-circuit, disassemble, heat or
dispose of batteries in flames.
• Do not keep the battery in a place exposed to
direct sunlight or in places with extremely high
temperatures, such as near a heater.
• If the battery fluid should leak, carefully wipe the
fluid off the inside of the battery compartment
and insert new batteries.
• Remove the batteries from the remote control
unit if it will not be in use for long periods.
• Used batteries should be disposed of in
accordance with the local regulations regarding
battery disposal.
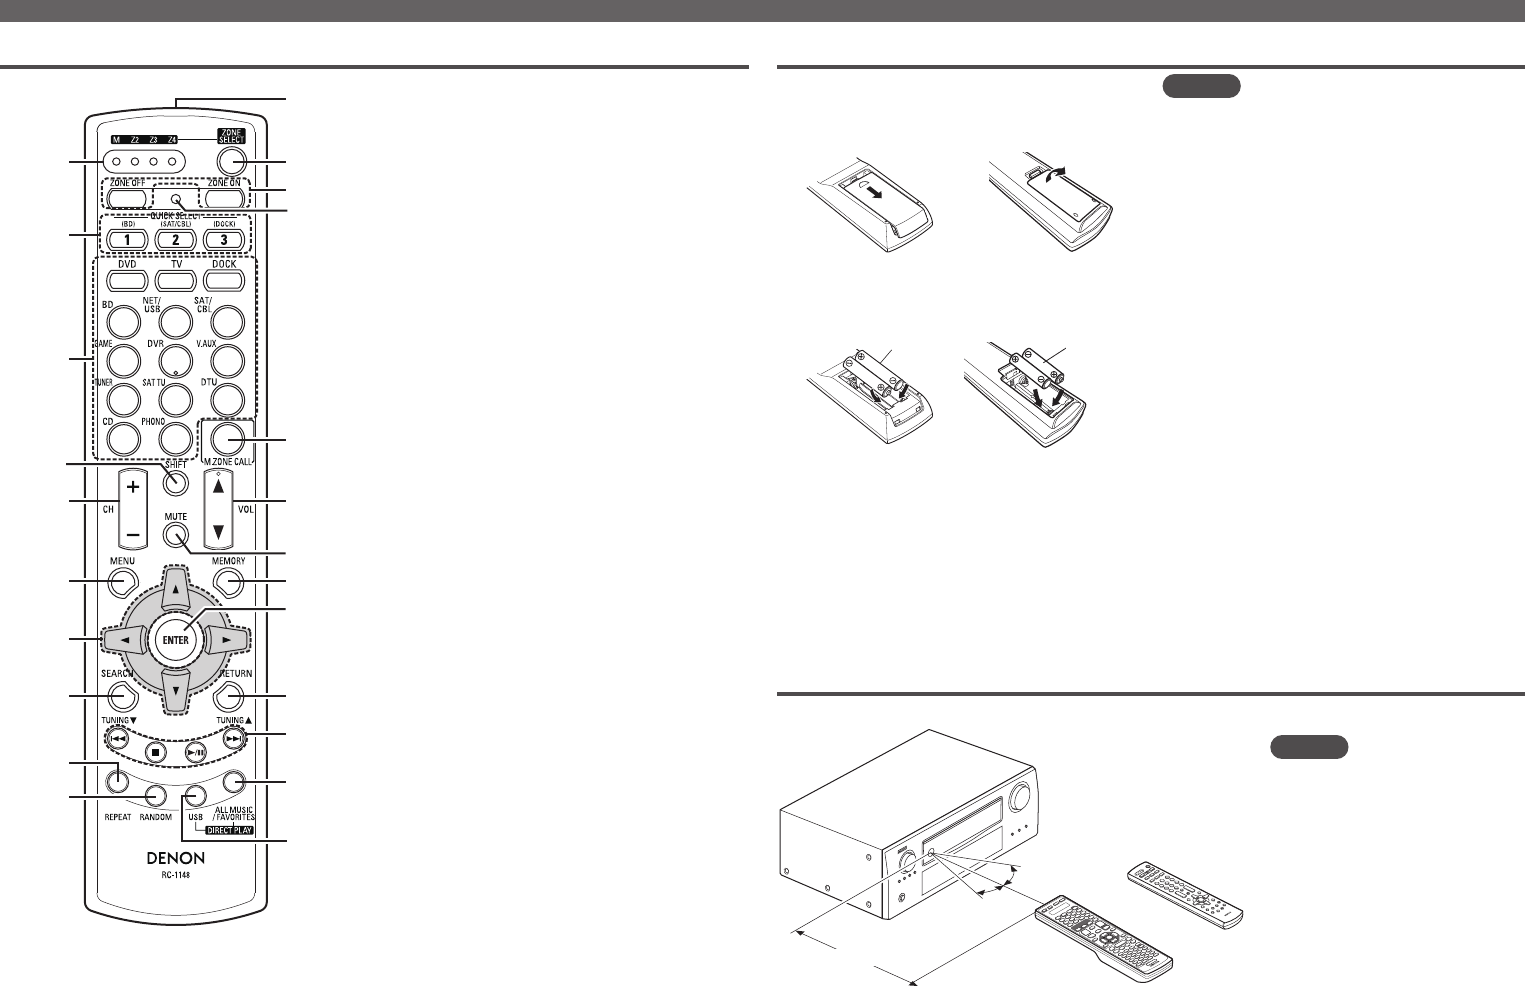
Remote control unit
Inserting the batteries
q Slide the rear lid in the direction of the arrow
and remove it.
(RC-1145) (RC-1148)
w Load the two batteries properly as indicated by
the marks in the battery compartment.
R6/AA
(RC-1145) (RC-1148)
R03/AAA
e Put the rear cover back on.
Sub remote control unit (RC-1148)
q
t
r
y
i
o
Q0
u
e
w
Q6
Q5
Q8
W0
W1
W2
W3
Q9
Q7
Q2
Q3
Q4
Q1
q Zone indicators ·········································(116)
w QUICK SELECT buttons ·······················(67, 74)
e Input source select buttons ·······(28, 116, 117)
r SHIFT button ·····················(34, 36, 39, 78, 117)
t Channel buttons (CH) ·····(34, 36, 39, 109, 117)
y MENU button ····························(80, 116 – 118)
u Cursor buttons
(uio p) ·····························(77 – 80, 116, 117)
i SEARCH button ·······(30 – 32, 34 – 37, 40 – 43,
45, 47, 49, 79, 116, 117)
o REPEAT button ······························· (116 – 118)
Q0 RANDOM button ····························(116 – 118)
Q1 Remote control signal transmitter ·········(124)
Q2 ZONE SELECT button ····················(116 – 118)
Q3 Zone power on/off buttons
(ZONE ON, ZONE OFF) ·······························(73)
Q4 Advanced setup button ···························(118)
Q5 MAIN ZONE call button
(M.ZONE CALL) ·········································(118)
Q6 Master volume control buttons
(VOL) ······················································(28, 73)
Q7 Muting button (MUTE) ··················(13, 29, 73)
Q8 MEMORY button ··························(34, 36, 117)
Q9 ENTER button ····················· (77 – 80, 116, 117)
W0 RETURN button ··························(80, 116, 117)
W1 System buttons
·····(30 – 32 40 – 43, 45, 47 – 49, 111, 116, 117)
• Skip buttons (8, 9)
• Stop button (2)
• Play/Pause button (1/3)
Tuner system buttons ················ (33 – 35, 117)
• Tuning up / Tuning down buttons
(TUNING df)
W2 ALL MUSIC/FAVORITES
(DIRECT PLAY) button ···················(116 – 118)
W3 USB (DIRECT PLAY) button ···········(116 – 118)
Operating range of the remote control unit
Point the remote control unit at the remote sensor when operating it.
30°
30°
or
(RC-1148)
(RC-1145)
Approx. 23 ft /7 m
NOTE
The set may function improperly
or the remote control unit may not
operate if the remote control sensor
is exposed to direct sunlight, strong
artificial light from an inverter type
fluorescent lamp or infrared light.
1.AVR4311CIEU_ENG_108.indd 124 2010/08/30 20:11:16


