Digital Audio Processor with Room Control Crestron C2N-DAP8RC
10 • Digital Audio Processor with Room Control: C2N-DAP8RC Operations Guide - DOC. 8187A
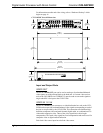
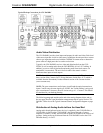
(Chassis Ground)
Use this chassis screw to connect the audio source(s) common ground(s) to the C2N-
DAP8RC.
AUDIO OUT
The two RCA connectors labeled A provide stereo output of the unit’s analog
crosspoint, without any processing. This is a unity gain output.
The two RCA connectors labeled B provide stereo output of analog crosspoint, but
with volume/tone control.
The eight RCA connectors that comprise the SURROUND SOUND OUT group,
provide surround sound encoded output to the FRONT, SURROUND, BACK,
CENTER, and SUBWOOFER channels. Typically, the FRONT, SURROUND,
BACK, and CENTER outputs are routed to a surround sound amplifier such as the
CNAMPX-7X200; the SUBWOOFER output goes to a powered subwoofer.
RS-232
The C2N-DAP8RC provides one RJ-11 connector for RS-232 communication with a
PC or third-party serial devices. This port supports baud rates up to 115K and
RTS/CTS hardware handshaking. Data Set Ready (DSR) and Data Terminal Ready
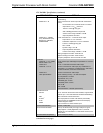
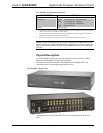
(DTR) are not supported. The pins are configured as shown in the following table.
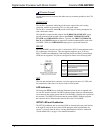
PIN FUNCTION
1 CTS (Clear to Send)
2 GND
3 RXD (Receive)
4 TXD (Transmit)
5 RTS (Request to Send)
6 Not connected
NET
This four-pin terminal block connector is used to supply unit power (24 VDC) and
for connection to other four-wire devices in the Cresnet system.
LED Indicators
The front panel PWR (Power) indicator illuminates when the unit is supplied with
24 volts DC from the network. The NET indicator flashes whenever communication
occurs between the control system and the C2N-DAP8RC (when the unit is polled on
the network). The NET LED indicates that the current SIMPL Windows program
has a network device defined at the same Net ID as the C2N-DAP8RC.
SETUP LED and Pushbutton
The SETUP pushbutton and its associated LED are located on the rear panel and are
to be used for setup of the unit’s network ID during the initial configuration of a
Cresnet
®
system or when the device is being added/replaced. Refer to “Method B
(Touch Settable IDs)” on page 13 for detailed information.


