


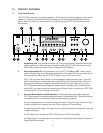


13 5.1 Channel In Button: This button selects the 5.1 channel analog input, which allows the user
to enjoy high-resolution, multichannel formats such as DVD-Audio and Super Audio CD. This
pure analog input completely bypasses any digital conversion or processing to maintain the
highest possible audio quality; thus, delay and bass management are disabled and no surround
modes may be selected when using the 5.1 channel analog input. This input is selectable
from the front panel only.
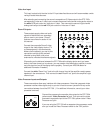
14 Input Selector Buttons and LED indicators: These allow easy choice of any available input.
When you select a particular input, the LED in the center of that button will light and the input
name will appear in the Display window to confirm your choice. Choosing an input automati-
cally selects the Surround mode last used with that input. You may change the Surround mode
at any time by using the Surround Mode button (#3 above).
15 Master Volume Control: This rotary knob adjusts the volume for all active speakers simulta-
neously. While it has the accustomed look and feel of the familiar analog volume control, it’s
internal implementation is digital. The distinction will be apparent only in that the knob will
NORMALLY be positioned near 12 o’clock for typical listening levels. This will be true for
all sources.
16 IR (infrared) Sensor: This small window receives commands from the remote controller. Do
not block this window with accessories, cables, CD jewelboxes, etc., or the remote control
will not work.
17 Room 2 Button: Pressing this button will activate the Room 2 output circuitry, enabling any of
six analog audio and video sources; LD, VCR, video aux, CD, tape, and tuner. Pressing the
Room 2 button a second time will cause the LED’s on the available source buttons to il
luminate. The source that is currently selected for Room 2 will be flashing. Choose the source
you want to send to Room 2 by pressing the desired source button, it will illuminate steadily
and the others will go off. Pressing and holding Room 2 for several seconds will turn the Room
2 output OFF.
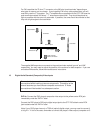
1.2 Rear Panel Inputs & Outputs — System Connections
Like the front panel, the GTP-760’s rear panel is carefully arranged to make hookup,
configuration, and use as simple as possible. However, the GTP-760’s extraordinary
capabilities take some study to use most effectively. We strongly suggest that you read this
section of the manual before beginning to hook up your system. You will save yourself much
time and effort if you carefully think out what you expect from your system: consider the
components you will use, where they’ll be placed, and how you will want them to work together.
The diagrams and notes in this section will probably answer most of your questions about interfacing
the GTP-760 with other components in your system. You will find more detailed information on initial
setup and configuration in following sections of the manual.
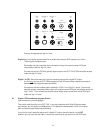
Note that the GTP-760’s RCA-style jacks have color-coded centers to make connections
easier. Use this key to help route cables properly:
YELLOW centers = VIDEO inputs (composite)
BLACK centers = DIGITAL AUDIO inputs
and
CENTER CHANNEL and SUBWOOFER
PREAMP inputs and outputs
WHITE centers = LEFT CHANNEL ANALOG AUDIO inputs
RED centers = RIGHT CHANNEL ANALOG AUDIO inputs
8