


For familiar music CDs (also called PCM signals) the choices are the same as for analog
inputs,
Dolby Pro Logic
,
Dolby Pro Logic/Cinema
,
symphony hall
,
stadium
,
jazz club
,
5-chan.
stereo
, and
2-chan. stereo
. Because CDs do not carry Dolby Digital signals, the
Dolby Digital
option is not available and the GTP-760 automatically bypasses that choice.
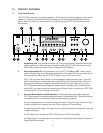
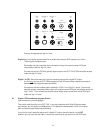
4 Dialog Enhance Button: A shelving filter with a corner frequency of 7 kHz that reduces the
often excessive high frequencies on some movie soundtracks that make them fatiguing to
listen to. It also provides a boost in the midrange output for center and front channel speakers.
5 Dynamic Range Button and LED Indicators: This button, usable only with a Dolby Digital
source, incrementally reduces the audio track’s dynamic range in four steps (full, 75%, 50%,
and 25%) to allow comfortable listening under a wide variety of conditions. The normal, or
default, position is full.
Although we usually prefer to reproduce a source’s full dynamic range (the difference between
very loud and very soft sounds), we occasionally need to reduce dynamics. For example,
when playing a movie late at night, loud explosions might wake sleeping family members.
Simply turning the volume control down would probably make a whisper in the next scene
inaudible. The Dynamic Range button solves this dilemma by progressively lowering the
volume of loud peaks while increasing the level of softer sounds. This allows you to hear every
element of the soundtrack without disturbing those around you or forcing you to strain to hear
delicate nuances.
6 Display Window: This shows all the pertinent information you will need to effectively use the
GTP-760 on a daily basis. We carefully designed this window to display only the data you need
at the time you need it. The window’s configuration will change as you ask the GTP-760 to do
different things. The display normally shows the input you’ve selected. If you’re currently
listening to AM or FM radio, the display shows that signal’s frequency. Additional information
appears as needed and we’ll note these appearances in subsequent sections of this manual.
7 Tuner Preset Buttons: These buttons allow quick access to up to 14 preselected AM or FM
broadcast frequencies. To save presets, tune to the desired station and press one of these 7
buttons. Continue to hold the button until it lights and the display shows the preset number.
Use the Shift button in conjunction with these buttons to select and save presets 8-14.
8 Shift (8-14) Button: This allows each of the 7 tuner preset buttons to do “double duty.” When
the LED in the center of the shift button is illuminated red, the 7 tuner preset buttons activate
tuner presets 8-14. When the LED in the center of the shift button is not illuminated, the 7
tuner preset buttons activate tuner presets 1-7.
9 FM/AM Button: As you might expect, this button selects AM or FM. In addition to the
selected broadcast frequency, a small “AM” or “FM” indicator appears in the bottom of the
Display Window to confirm your choice.
10 Seek/Manual Button: This controls the tuner’s scan function and working of the tuning buttons.
In SEEK - goes UP to the next available station.
In MANUAL - moves UP in increments to the desired frequency you select manually.
11 Tuning Down/Up Buttons: These allow easy selection of all the stations your GTP-760 can
receive. Remember that these Tuning buttons will scan to the next active or to the adjacent
frequency depending on how you’ve set the Seek/Manual button described above.
12 Dim Button: This reduces Display window brightness for listening or viewing in a dark
room. The button simply switches between full and reduced illumination.
7