


31
English
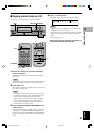
HDD RECORDING
3
RECORDING FROM AN EXTERNAL COMPONENT ONTO THE HDD
■ Recording input audio source
You can make recordings from the component such as a cable TV tuner or DVD player connected to this unit.
Note
This unit cannot input digital signals other than PCM signals.
Memo
Recording onto the HDD is made in the unit called “disc”. The maximum length of one disc on the HDD is 179 minutes 59 seconds. If the
recording has been made exceeding the maximum length, the recording will be made continuously to the next available disc.
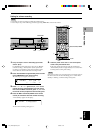
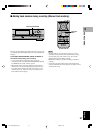
H
DD
/
CD RECORDER
TEXT/TIME MODE
MULTI JOG
DIGITAL REC LEVEL
PUSH ENTER
TRACK NO.
FINALIZE ERASE
BOOKMARK
COMPLETE
MENU
CLEAR
MIN MAX
OPTICAL
ANALOG REC LEVEL
INPUT
REC
COAXIAL
ANALOG
COPY
A.M.Q.R.
CDR
H
DD
w/d
INPUT aREC
ENTER
COMPLETE
TRACK NO.
WRITE
HDD
CDR
GROUP SKIP
CLEAR
OPEN/CLOSE
COPY
FINALIZE
REPEAT
1
ABC
2
DEF
3
GHI
4
JKL
5
MNO
6
PQR
7
STU
0
SPACE
MODE MENU
8
VWX
10
SYMBOL
BOOKMARK
9
YZ
A. M. Q. R.
ERASE
RANDOM
TIMER REC
INTRO
REC
INPUT
TEXT/TIME
W/D
A
REC
INPUT
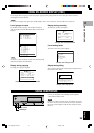
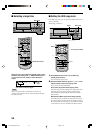
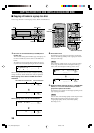
1. Press REC while the HDD is selected (P.14).
The HDD mark flashes, and the disc and track numbers to be
recorded are indicated on the display. Recording has not been
started yet at this stage. (HDD recording standby mode)
Memo
• In the HDD recording standby mode, you can specify the
settings for HDD recording. For details, refer to “Setting the
HDD recording mode” (P.35).
•You can specify a disc to where data is copied. For details,
refer to “Selecting a target disc” (P.28). (When no disc is
specified, the unit automatically selects the smallest disc
number that does not contain any data.)
2. Select the input source to be recorded.
The lamp for the selected input (OPTICAL, COAXIAL, or
ANALOG) lights.
3. Adjust the recording level.
The adjustment of the digital recording level is not normally
necessary. However it is possible to adjust the recording level
(P.34) to suit your needs.
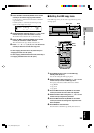
4. Press w/d to start recording.
5. Start playing the source.
Press w/d to stop recording temporarily. The HDD mark
flashes and the track number is advanced to the next.
Press w/d to resume recording.
Memo
This unit automatically adds track markers to track data while
recording external audio sources. To add track markers
manually, refer to “Adding track markers during recording
(Manual track marking)” (P.37).
6. Press a to stop recording.
The first track number of the disc at which recording has been
stopped is indicated on the display.
IMPORTANT
•Never turn off the power of this unit during recording.
Recording may not be correctly made, or the data on the HDD
may be damaged.
• During recording, make sure that this unit is not subjected to
shock or vibration as the HDD may be damaged.
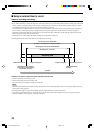
Disc number to be
recorded
Track number to be recorded
D002 1 000
REC
GROUP
L
R
dB –30 –10 –6 –2 0
SYNC
D002 1 001
REC
L
R
dB –30 –10 –6 –2 0
SYNC
D002 1
GROUP
L
R
dB –30 –10 –6 –2 0
G
103_HD1500(E)26-37.p65 3/18/05, 15:3731