Page: 26 Model MRC88
© 2003 Xantech Corporation
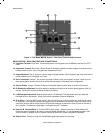
Using good quality RCA-type patch cables connect the source VIDEO OUTPUT jacks of the ‘Primary
controller’ [Figure 3-(23)] to the corresponding source VIDEO INPUT jacks on the Secondary Controller -
Figure 3-(22).
Z
ONE AUDIO INPUTS
(ADVANCED)
Use 3.5mm Stereo Mini Jack to Stereo RCA Plug adapter to connect Zone Specific Audio Sources (i.e.
Audio Server or other Zone Specific Audio Component) to the appropriate Zone Audio Input - Figure 3-(24).
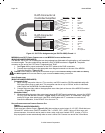
The 3.5mm Stereo Jack is wired as follows: Tip = Right Audio Input; Ring = Left Audio Input; Sleeve =
GND. The Zone Audio Input feature is enabled via Dragon Drop-IR™ software in the ADVANCED
configuration only. When enabled, the Zone Audio Input will override the Source 1 Input connected at the
Audio Left/Right RCA Input terminals - Figure 3-(22). Zone Audio Inputs do not support Video.
(EXPANDED)
For Zones 1-8, connect to the Primary Controllers Zone Audio Input as stated above. For Zones 9-16
connect to the Secondary Controllers Zone Audio Input [Figure 3-(24)] as stated above.
IR
CONTROL CONNECTIONS
(BASIC/ADVANCED)
Plug the supplied 283M IR emitters into the appropriate IR Emitter jacks - Figure 3-(26). Be careful to
match the source audio and video connection number on the MRC88 to the IR Emitter jack number. This
will ensure that the IR control signal will be routed to the correct source component. Find the IR sensor
window on the source component and attach the emitter to the components sensor window after removing
the protective paper cover on the flat side of the emitter head. A Common IR jack is also provided for
connection to other auxiliary devices that are not source specific - Figure 3-(27).
(EXPANDED)
Connect emitters to the ‘Primary Controllers’ IR Emitter jacks - Figure 3-(26) as noted above.
Note: The appropriate source IR Emitter of the ‘Secondary Controller’ will also flash regardless of what
zones keypad issues the command but it is recommended to use the emitter jacks of the Primary unit.
S
ENSE INPUT CONNECTIONS
(BASIC/ADVANCED)
The sense input connection will typically be used to sense the power state of a source component using the
Xantech CSM1 Current Sense Module (optional). Plug the 3.5mm mini plug from the CSM1 into the
appropriate sense jack – Figure 3-(22). Be careful to match the source audio and video connection number
on the MRC88 to the appropriate sense jack number. The CSM1 plugs into an AC power source. The
component power cord plugs into the CSM1. (Refer to instructions included with the CSM1 unit).
CSM1 Threshold Adjustments
a. First, make sure the 3.5mm mini-plug is plugged into the appropriate sense jack on the MRC44 and that
the MRC44 is powered ON. (The CSM1 gets low-voltage DC power from the MRC44 – not from the AC
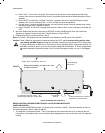
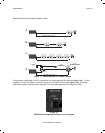
line. See Figure 2-Top for mini-jack pin out )
b. Select the correct position of the RANGE slider switch – the HI position is for devices with a high
current draw when ON, the LO position is for devices with a low current draw when ON (based upon the
lowest current draw state of the component when ON).
c. Manually turn the component ON.
d. Using a small (1/8” wide) blade screwdriver, rotate the current control to the full CLOCKWISE position
(LO CURRENT).
e. Rotate the control COUNTER-CLOCKWISE (towards the HI CURRENT position) until the Threshold
Adjustment LED goes OFF.
f. Turn the component OFF (Standby Mode).
g. Rotate the control CLOCKWISE until the Threshold Adjustment just goes ON.
h. Set the control to a point midway between these two settings. This should be the correct setting.
NOTE 1: If you have trouble with the threshold adjustment correctly detecting the ON and OFF states of
the component, try changing the RANGE slider to the opposite position and then try the adjustment again.
NOTE 2: If the Threshold Adjustment LED does not go ON and OFF with the component power, make
minor adjustments to the threshold adjust until the LED is in proper sync.


