


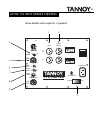

18
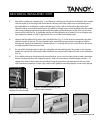
MECHANI CAL INS TALLATION 110SR
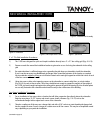
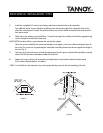
6) Leave some exces s wire hanging through the opening in the PIR so the drywall contractors can cut a locate hole
and drop the wires through. You may also want to consult with them on cutting out the opening for the s ub
as t hey will like ly have t he power t ools (F ig . 11 ) nece ssary to qu ickly a nd accurat e ly cut out t he opening (F ig . 5).
7) If you are inexpe rie nced, but plan on doin g this you rse lf , the job can be made e asie r by proceeding in two steps.
1) “Hog” out t he major inside portion of the ma teria l (F ig . 5).
2) Ca re fully cut out t he recess for at ta ching the subwoofe r (Fig . 6 ).
8) A word about the Rotozip™ tool for cutting holes in wallbo ard: using the correct bit, and accurately settin g th e
cutt ing depth will gr e a t ly reduce any errors caused by t he t ool “gett ing a wa y” or cutt ing in to the P IR. Use only a
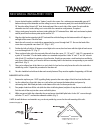
Guidepoint™ bit as pictured (Fig. 11); it will follow the inside perimeter of the PIR. For the first cut, s et the
depth to the thicknes s of the wallboard plus 5/8” (the thicknes s of the PIR). Example: 5/8” PIR plus 5/8” wall
board e qu als 1 -1/ 4 ” cutting dept h.
9) A fter the m ajority o f th e material has been remo ved from the center o f th e PIR, yo u can set the cutting dep th fo r
the second step. H old ing the to ol up to th e op ening, set the depth gauge so that th e Guidepoint™ bit will n ow
fol low the r ecesse d cut a way in t he PI R.
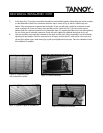
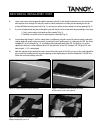
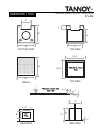
Figure 5: Cutting drywall us ing the Rotozip™ .
Figure 6: Completed install showing the reveal
of PIR relative to the ceiling board.
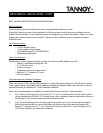
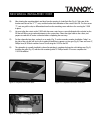
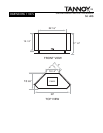
Figure 7: Installing the subwoofer using the
ledge to temporarily s ecure it.
Figure 8: Attaching the subwoofer to the PIR.