


23
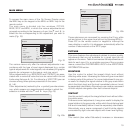
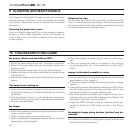
HORIZONTAL/VERTICAL KEYSTONE
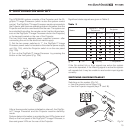
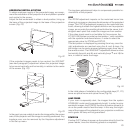
To obtain maximum quality of the projected image, we recom-
mend the installation of the projector on a level platform parallel
and central to the screen.
Adjust the feet underneath to obtain a level position, lining up
the base of the projected image to the base of the projection
screen (Fig. 22).
1
2
3
-
C
L
A
S
S
1
L
A
S
E
R
P
R
O
D
U
C
T
5
0
0
LI
N
K
Fig. 22
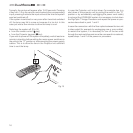
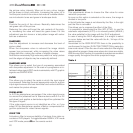
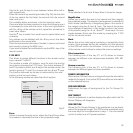
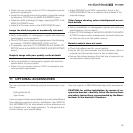
If the projected images needs to be centred, the
LENS SHIFT
(see next paragraph) adjustment allows the projected image
to be moved vertically and horizontally, in relation to the centre
of the screen
(Fig. 23).
1
2
3
-
C
L
A
S
S
1
L
A
S
E
R
P
R
O
D
U
C
T
5
0
0
L
I
N
K
1
2
3
-
C
L
A
S
S
1
L
A
S
E
R
P
R
O
D
U
C
T
5
0
0
L
I
N
K
Fig. 23
In the event you are unable to centre the image within the screen
area, tilt the projector until the image is correctly positioned. Any
keystone error can be removed by the Keystone adjustment
in the Set up menu.
The keystone adjustement helps to compensate possible ho
-
rizontal tilts of the projector.
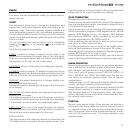
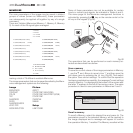
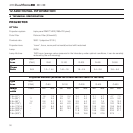
LENS
The ZOOM adjustment impacts on the motorized zoom lens
allowing to increase or decrease the dimension of the projected
image. The FOCUS adjustment impacts on the motorized lens
focus, allowing to obtain the highest definition on the projected
image, an accurate focus setting should allow the viewer to di
-
stinguish each pixel that create the image one from another.
If the video signal used is not suitable for this purpose, the
HT 500 LINK system provide two test pattern , each available
with the ajustment mentioned above, in order to select the
appropriate value for ZOOM and FOCUS.
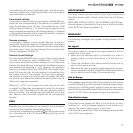
This test pattern is displayed by pressing the • key, once the
right adjustments are reached using the fl and ‡ keys, the
test image can be easly removed pressing again the • key of
the remote control. The LENS SHIFT adjustment allows to move
horizontally (keys fl and ‡) and vertically (keys · and ‚) the
lens, in order to center the image.
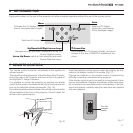
FOCUS
FOCUS
FOCUS
??
?
ZOOM
FOCUS
1
2
3
-
C
L
A
S
S
1
L
A
S
E
R
P
R
O
D
U
C
T
50
0
L
IN
K
Z
O
O
M
ZO
O
M
ZO
O
M
ZOO
M
Fig. 24
In the initial phase of installation the configurable keys (F1, F2)
serve as optical zoom and optical focus (Fig.24).
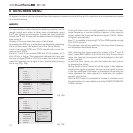
LAMP POWER
If your room is especially dark, the images from the system
HT500LINK could result execessively bright. In order to enjoy
wonderful images, the
ECOMODE
function activation allows to re
du ce the power used to feed the lamp. In this way, the bright
-
ness of the image will be adapted to your projection conditions
and a grater life lamp will be guaranteed.
POWER ON
If active (
AUTO
) allows to power up the system directly from the
power feeder, once the initializing phase is completed.