


WWW.POLKAUDIO.COM/AMPS 7
6
PA 12V AMPLIFIERS
ENGLISH
Tools YouMay Need
• Phillips head screwdriver
• Solderless, crimp-onconnectors anda crimpingtool
• Safety glasses
• Wire strippers andcutters
• Electrical tape
• Grommets forpassing wiresthrough metalcar walls
• Amplifier PowerWire Kit (availableat your authorized
Polk AudioDealer)
SAFE LIMITS OF OPERATION
Polk Audiospecifies the recommendedamplification range
for eachof itspassive (non-amplified)loudspeakers. Typi-
cally thatspecification willbe expressedas arange of
power suchas 20-200Watts (perchannel). It is important
to understandwhat thosenumbers meanwhen choosinga
receiver or amplifier foryour Polkloudspeakers. Thelower
number indicates thelowest continuous ratedpower that
will yieldacceptable performance in atypical listening
environment. Thehigher numberindicates thehighest
per channel powerthat shouldbe usedwith yourPolk
speakers. Thatnumber shouldnot beconfused with a
“Power Handling”specification andit does notimply that
the speakerwill safelyhandle thatfull amount ofpower
on along-term basis.We specify awide rangeof power
ratings becausenot allelectronics manufacturersuse the
same methodfor rating power.In fact,high qualitylower-
rated amplifierssound betterand playlouder thanlow
quality unitswith higherpower rating.
Automobile horsepoweris goodanalogy. Yourcar probably
has far morehorsepower thanit needsfor yourdaily com-
mute andis likely capable ofgoing well over120 MPH
(190KM/hr). Having that extrapower isgood foron-ramp
acceleration and dangeravoidance (likegetting awayfrom
brain-eating zombies) butthat doesn’tmean that it is advis-
able tooperate your car onNorth Americanhighways at
full powerand maximumspeed for anextended periodof
time. Justask your localstate trooperif youare indoubt.
Similarly, werecommend usingamplifiers andreceivers
with ratedpower abovethe PowerHandling limitsof our
speakers because havingextra poweravailable for short
terms peaksis conducive tobetter soundquality, maximum
dynamic range andeffortless high volumeoutput. Butwe
strongly urgeyou not touse thefull power ofyour ampor
receiver fordaily listening.
Loudspeakers canbe damagedwhen anamplifier, regard-
less ofits wattage, is madeto play at higher listening levels
than itspower canclearly produce.Operation atthis level
can resultin veryhigh levelsof audibledistortion originating
in theamplifier, whichcan adda harsh, grittysound toyour
listening material.If youhear distortion—turnthe vol-
ume downor riskdamaging yourspeakers. Youcan
damage justabout anyspeaker, regardlessof powerrating,
if youdrive anamplifier toor beyondthe pointof distortion.
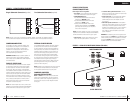
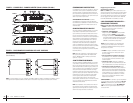
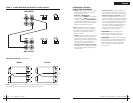
INSTALLATION GUIDELINES
1
.Pleaseread thisowner’s manualcarefully before
installingthis amplifier.
2.Disconnectthe batteryground terminalprior
tomaking anyelectrical connections.
3.Checkfor anyhazards orobstructions suchas gas
tanks,fuel orbrake lines,and wiringharnesses
beforemounting theamplifier.
4.Picka mountinglocation thatwill provideadequate
accessand ventilationand protectthe amplifierfrom
heat,moisture, and dirt.
5.Tosecurely mount youramplifier youmust firstremove
thetop coverassembly. Unscrewthe four(4) topcover
assemblyretaining screws.
6.Avoidsharp metalareas whenrouting cablesto the
amplifier,and runRCA cablesaway fromthe power
cablesand otherpotentially noisycar harnesses.
7.Theamplifier shouldbe groundedwith ashort, heavy
gaugewire connecteddirectly to thecar ata bare metal
surface,preferably scrapedbody sheetmetal. Donot
usefactory groundlocations, seatbolts, orbrackets
thatare spotwelded.
8.Alwaysfuse yourpower connectionwithin 8to 10inches
ofthe batteryterminal. Use afuse orcircuit breakerrated
slightlymore thanthe on-boardfuse(s) ofthe amplifier(s).
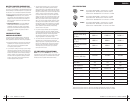
Thegauge ofpower wireused shouldtake intoaccount
thetotal currentdraw ofthe system,and thelength of
wireused. IASCAand otherauto soundcompetition
organizationshave chartsavailable forthis; youcan
alsofind achart inthe MECPstudy guide. Minimum
wiregauge recommendations forthe individualampli-
fiersare listedon thespecification page.Always use
thesame gaugewire forthe amplifierground thatyou
usefor thepower wire.Be sureto examinethe battery
groundcable of thevehicle, andif necessary,upgrade
itby addingan additionalground wirethat isthe same
gaugeas theamplifier’s power wire.Remember, the
amplifiercan onlydeliver itsrated outputwhen itis not
currentlimited bythe powerand groundsupply wires.
9.Thisamplifier is designedto drivea speakerload that
measuresfrom 1to 4Ohms. Keepin mindthat heatis
thelong-term enemyof automotiveelectronics andthe
loweryour speakerload, themore heatis generated.
Forlow-impedance speakerapplications or restricted
ventilationinstallations, anexternal coolingfan may
beadvisable.
WARNING
High-poweredcar audiosystems may producesound
pressurelevels that exceed thethreshold atwhich
hearingloss mayresult.
Theymay alsoimpair adriver’s ability tohear traffic
soundsor emergencyvehicles. Usecommon sense
andpractice safelistening habitswhen listening to
oradjusting your audio system.
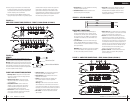
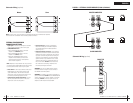
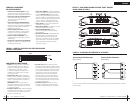
FEATURES
• Super-efficientClass DPWM designruns
muchcooler thanconventional amps.
• High-speedMOSFET switchingpower supply.
• High-currentcomplementary ClassD MOSFET
outputsstable intoone ohmloads.
• Thermal,DC offset,reverse polarityand short
circuitprotection withstatus LED.
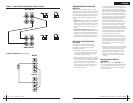
• Master/slavefunction supportstwo amps
bridgedto one load.(PA600.1/PA1200.1)
• Continuouslyvariable 12dB/octave
low-passcrossover.
• Switchablesubsonic filter 24dB/octave.
• Switchable8 dB bass EQ function.
• Switchable180° phaseinversion.
• Remotesubwoofer levelcontrol function.
• Variableinput sensitivityoptimizes match
withdifferent signalsources.
• Chrome-platedwire terminalsand RCAconnectors
ensuremaximum signal transfer.
• Ruggedheat sinkand cover.
• Unitygain pass-throughRCA jacks.
GETTING STARTED
TakeInventory
Checkto ensureyou haveeverything inyour
PolkAudio amplifier cartonto start enjoying
yoursystem. Inside,you shouldfind:
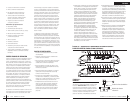
1.Polk AudioAmplifier
(eitherPA400.1, PA600.1or PA1200.1)
2.Phillips Screws(4)
3.Mounting Washers(4)
4.Locking Washers(4)
5.Rubber Washers(4)
6.Fuse Replacements
7.Wire Harness
8.Owner’sManual
9.OnlineRegistrationCard
10.Remote VolumeModule
11.Phone LineCord
ImportantNote: Ifanything ismissing or damaged, orif
yourPolk Audio amplifier failsto operate,notify yourdealer
immediately.We recommendkeeping youroriginal carton
a
ndpacking materialsin caseyou needto shipthe unitin
thefuture.
Inthe eventthat youramplifier requiresservice oris ever
stolen,you willneed to havea recordof the product’s
serialnumber. Pleasetake thetime to enterthat number
inthe spaceprovided below. The serialnumber canbe
foundon thebottom panelof theamplifier andon the
amplifierpackaging.
SerialNumber:____________________________
PolkAudio CustomerService 800-377-7655
(M-F,9-6 EST,US &Canada only)or viaemail
polkcs@polkaudio.com.Outside theUS &
Canada,call 410-358-3600.To learnmore about
PolkAudio 12Vamplifiers go to www.polkaudio.com
PolkAudio, Inc.5601 MetroDrive Baltimore, MD21215
READ THIS FIRST
Installinga caraudio systemis aserious project.If youhave
anydoubts aboutyour abilityto executeany ofthe installa-
tionsteps foundin thismanual, saveyourself alot ofgrief
andcontact aprofessional installer.Your PolkAudio dealer
isa goodplace tofind one.If youintend todo theinstalla-
tionyourself we assume youpossess someskill inthe proper
useof handand powertools. Nomatter howmuch installa-
tionexperience youhave, werecommend thatyou…
• Readthis manualthoroughly before youbegin.
• Planyour installation carefully.
• Allowenough timeto completethe installation
withoutrushing.
• Takesteps to protectyour carand upholstery
fromunwanted scratchesand punctures.
• Wearproper protectivesafety gear.
ENGLISH