


17
Chapter One : Connecting Your Devices
Connections
Connecting Your Primary CD Player, continued
Do not plug in the receiver to AC power until you have
connected all your devices.
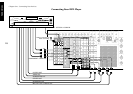
This section focuses on the connections from your 200-Disc
CD Changer to the KRF-X9995D. Please refer to your
changer’s instructions for more detail about its connection
jacks and capabilities.
Each set of instructions in this section shows one of several
possible variations on connecting your CD player(s). For
further assistance on optional configurations, contact the
store where you purchased your CD player(s).
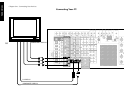
The illustration shows a Kenwood 200-Disc CD Changer.
Your CD player may look different.
The Kenwood DPF-J9030, DPF-J9020 and DPF-J9010 200-
Disc Changers contain two CD transports. You must con-
nect these devices as though they were two CD players.
What if I Have a Video CD-Compatible CD
Player?
Connect the audio and video cables from the CD player to
any unused Video jack set.
Do not connect the system control cable in this instance.
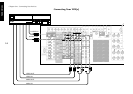
To Connect a Kenwood 200-Disc CD
Changer:
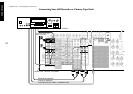
1. Connect one set of audio cables from the 200-Disc
Changer to the receiver’s CD1 jacks. If you have a DPF-
J9030, DPF-J9020 or DPF-J9010, connect Output A to
the receiver’s CD1 jacks and Output B to the receiver’s
CD2/TAPE2 MONITOR PLAY IN jacks as shown to the
left.
2. Connect the digital cable from the changer to the
receiver’s CD1 digital jack as shown to the left.
The illustration shows two digital connections, one for
coaxial connection and one for optical connection. Your
CD player supports one or the other of these connec-
tion methods—do not connect both.
3. Connect the system control cable from the changer to
the SYSTEM CONTROL jack as shown to the left.
Be sure that the SL16/XS8 switch on the changer is set
to SL16.
If you are connecting more than one Kenwood device
with a system control cable, see “What if I Have Several
Kenwood Devices (System Control Chaining)?” on
page 32 for more information.
4. Connect the SL16 text cable (communication cable)
from the changer to the receiver’s SL16 TEXT jack as
shown to the left.
5. Go to “Noting Your Devices” on page 3 and note which
jacks you used to connect your CD changer. In addi-
tion, note the brand name and model number of the
CD Changer.
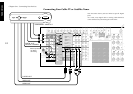
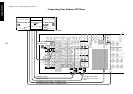
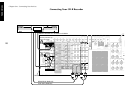
To Connect Any Other Primary CD Player or
Changer:
1. Connect the audio cables from the CD player’s audio
jacks to the receiver’s CD1 jack set as shown to the left.
2. Connect the digital cable from the CD player’s digital
jack to the receiver’s CD1 digital jack as shown to the
left.
The illustration shows two digital connections, one for
coaxial connection and one for optical connection. Your
CD player supports one or the other of these connec-
tion methods—do not connect both.
3. If you are connecting a Kenwood CD Player with sys-
tem control, connect the SYSTEM CONTROL cable from
the CD player to the system control jack as shown to
the left.
Be sure that the SL16/XS8 switch on the player/changer
is set to SL16.
If you are connecting more than one Kenwood device
with a system control cable, see “What if I Have Several
Kenwood Devices (System Control Chaining)?” on
page 32 for more information.
4. Go to “Noting Your Devices” on page 3 and note which
jacks you used to connect your CD player/changer. In
addition, note the brand name and model number of
the CD player or changer.
To Connect a Secondary CD Player:
See “Connecting Your Secondary CD Player or Tape Deck”
on page 24.
Do not connect the system control cable in this instance.
When playing a HDCD disc in the HDCD format (high
quality mode), use the digital connection jack.