15
EN
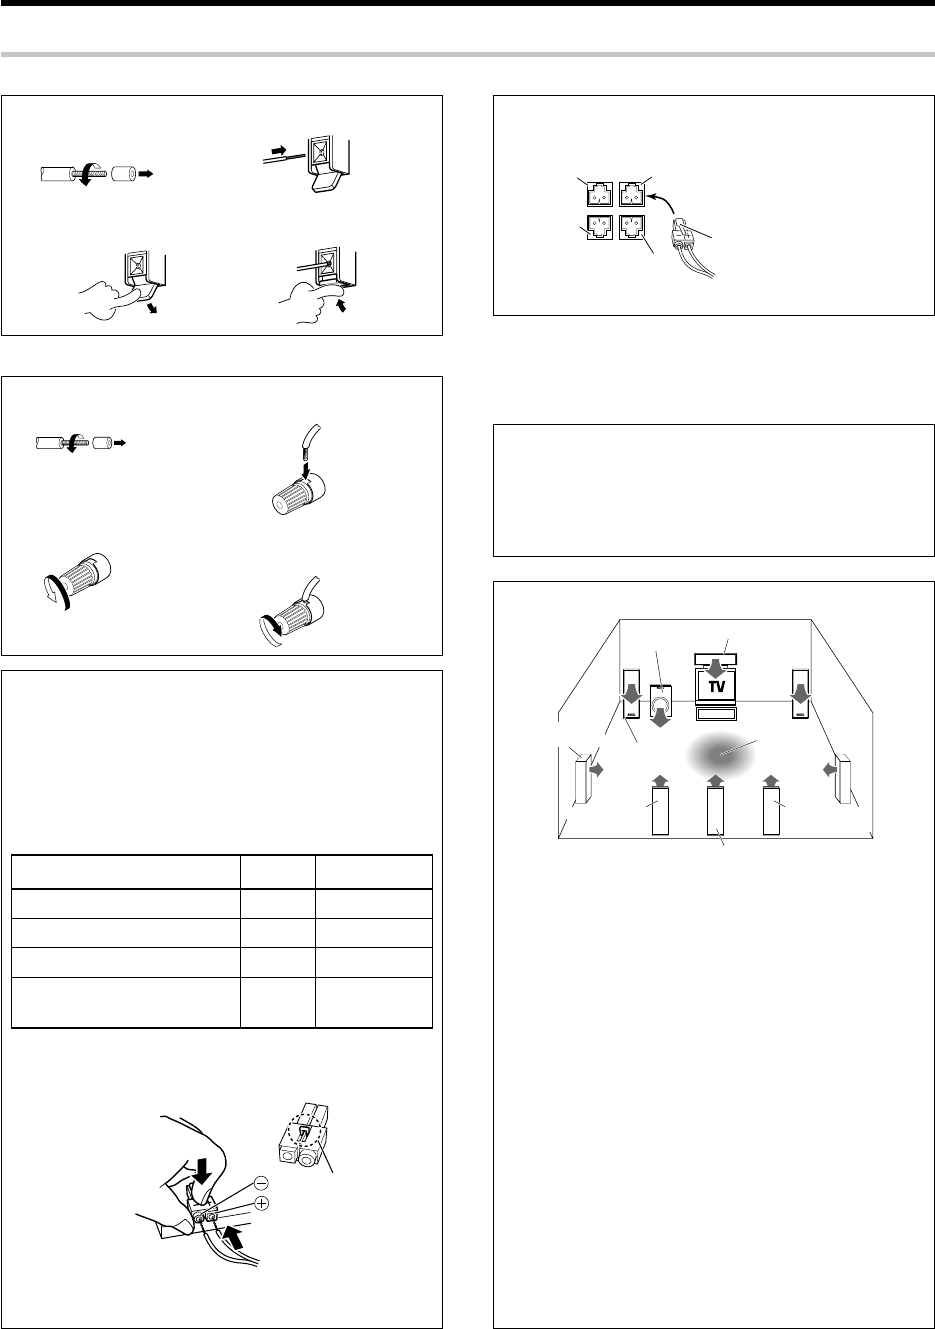
Speaker placement
Front speakers : Place the left and right speakers at each side of your TV.
Angle the speakers towards the listening area to enhance the stereo
effect.
Center speaker : Place the center speaker on the center between the
front left and right speakers. Tilt the speaker upward or down-ward so
that it is directly facing the listening area.
Surround speakers : Place the surround speakers as high as possible,
either directly to the sides of the listening area or else slightly behind
the listening area. Adjust the angles so that these speakers are facing
directly towards the listeners.
Subwoofer : Usually, place the subwoofer in the front center position in
the listening room, near one of the front speakers near the center
speaker. (Since the subwoofer has less directivity than other speakers,
it can be placed almost in any position that can offer the best low
frequency reproduction according to the room layout.)
Surround back speakers : Place the surround back speaker behind the
listining position, at the same height as the left and right surround
speakers.
¶ Although the ideal surround system consists of all the speakers listed
above, if you don't have a center speaker or a subwoofer, you can
divide those signals between the available speakers in the speaker
settings steps to obtain the best possible surround reproduction from
the speakers you have available. ¢
Setting up the system
Speaker impedance
After confirming the speaker impedance indications printed on the
rear panel of the receiver, connect speakers with matching imped-
ance ratings. Using speakers with a rated impedance other than that
indicated on the rear panel of the receiver could result in malfunctions
or damage to the speakers or receiver.
¶ Never short circuit the + and – speaker cords.
¶ If the left and right speakers are connected inversely or the
speaker cords are connected with reversed polarity, the sound
will be unnatural with ambiguous acoustic imaging. Be sure to
connect the speakers correctly.
Connecting the speaker terminals
Connect the connector to the terminal on the receiver with the
same color by inserting the connector straight until it clicks.
1 Strip coating.
2 Loosen.
3 Insert.
4 Secure.
1 Strip coating.
2 Push the lever.
3 Insert the cord.
4 Return the lever.
Confirm the connector
orientation before insertion.
For U.S.A. and Canada
For Europe and Australia
Attaching the speaker cord connectors;
Connect each speaker cord by matching the color of the connector
with that of the terminal to which the speaker cord is to be
connected.
If the provided speaker cords are too short, they can be replaced
with commercially available speaker cords [AWG24-18 standard
(conductor section diameter 0.511 to 1.024 mm(0.02 to 0.04 in.))].
When using commercially available speaker cords, strip the vinyl
coating on the end of each cord by about 1 cm (0.39 in.) and twist
the conductor wires so that they are not disentangled.
While applying the projected part of the connector against a hard
desktop, etc., insert the conductor sections of the speaker cord
into the connector.
¶ After attaching the speaker cord connector, hold it and pull the speaker
cord lightly to ensure that it will not come out.
CENTER
SURR R
SURR L
SURR BACK/SW
Projected part
(White)
Connector
Green
Center speaker
Grey
Surround speaker (Right)
Blue
Surround speaker (Left)
Brown
Surround back speaker
or Subwoofer
Connected speaker
Green
Brown
Grey
Blue
Center speaker
Front
speakers
Listening
position
Surround
speakers
*Surround Back
*Right speaker
*Surround Back
*Left speaker
*Surround Back speaker
Subwoofer
* For Surround Back speaker, you may place either two Surround
Back speakers (Surround Back Left speaker and Surround Back
Right speaker) for 7.1 channel surround sound system or one
Surround Back speaker for 6.1 channel surround sound system.
Connected
terminal
CENTER SURR R
SURR BACK
/SW
SURR L
Twist
Twist
*5462/08-19/EN 04.4.13, 8:01 PM15


