


41
English
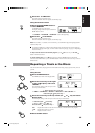
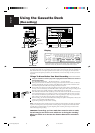
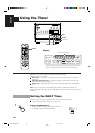
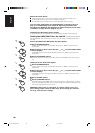
5. Press the cursor key up or down (¡ or 1) and select the
disc.
The display changes with each press of the cursor
keys as shown below.
+ Press the down ( 1) cursor key
3 Ô 2 Ô 1
Press the up (¡ ) cursor key =
• If you press the DISC (1-3) buttons instead of pressing the up or down (¡ or 1)
cursor keys, you can select the disc.
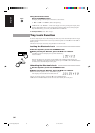
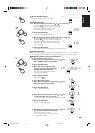
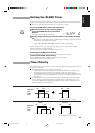
6. Press the SET button.
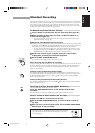
After “TAPE C - -” appears on the display, the
display shows you the length of tape required to
record the CD you selected.
• You can select a different length of tape,
depending on the actual size of the tape you
are using, from eleven possibilities programmed
into the System: 40, 46, 50, 54, 60, 64, 70, 74,
80, 84, 90. Use the 4 or ¢ key to
select the length that matches the length of tape
you will be using, or the length nearest to the length you will be using.
• If you pick a tape length shorter than the total playing time of the CD, the last tracks on both
sides of the tape will be faded out as the tape ends.
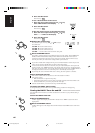
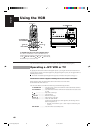
7. Press the SET button.
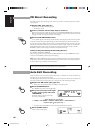
“SIDE-B” blinks on the display and the tracks that
will be recorded on side B of the tape are displayed.
• To display the tracks that will be recorded on
side A of the tape, press the SET button again.
The Unit switches between side A and side B with each press of the SET button.
8. Press the ENTER button.
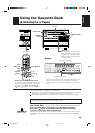
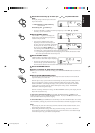
9. Insert a cassette in Tape Tray to record on.
When you want to record on both sides of a tape, press the REVERSE MODE button to turn Reverse
mode on.
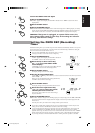
10
. Press the CD REC START button.
The Unit plays the CD and starts recording. If the tape has not been rewound, the Unit rewinds the
tape before starting to record the CD.
When the tape is ready, to prevent the start of a track being cut, the System creates a blank period of
about 10 seconds before it starts to record the CD. While a blank period is being created, “TAPE
SIDE-A STANDBY” scrolls through the display. (The System also creates about 10 second blank
period at the start of side B of the tape. While a blank period is being created, “TAPE SIDE-B
STANDBY” scrolls through the display.)
When the recording is finished, the message “CD REC FINISHED” scrolls by on the display. The CD
Player and Cassette Deck stop.
To stop at any time while recording, press the REC START/STOP button or the 7 button. The
recording stops when you press the REC START/STOP button. If you press the 7 button, the unit creates
a four second blank section of tape before stopping.
To cancel Auto Edit, press the 0 button on the CD Player or the ALL CD EJECT button. You can also
cancel Auto Edit by selecting play mode from the Unit or the Remote Control after stopping the recording.
Notes:
• If you change any of the CD’s while using Auto Edit, Auto Edit will be cancelled. Therefore, do not
change the CD’s while using Auto Edit.
• When making SLEEP timer settings while doing Auto Edit recording, set the time so that there is
enough leeway to finish the recording before the power goes off. If the time is set to about the length
of the CD, the power may go off before recording finishes.
TAPE
CD
=
TAPE
AUTO EDIT
SET
TAPE
CD
=
TAPE
AUTO EDIT
TAPE
CD
=
TAPE
AUTO EDIT
\
TAPE
5678
CD
=
TAPE
AUTO EDIT
SET
ENTER
CD REC
START
CA-TD77R[EF]/EN/p26-52 97.7.24, 2:44 PM41