


18
English
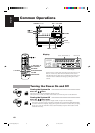
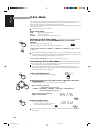
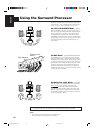
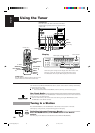
Perform the steps below using the buttons on the Remote Control.
1. Press the SURROUND CONTROL button.
2. Press the PRO LOGIC button.
“PRO LOGIC” appears on the display and the SURROUND indicator lights up.
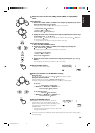
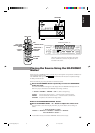
3. Select the desired Center Speaker mode.
Press the CENTER MODE button. The display changes with each press of the button, as shown
below.
= NORMAL = WIDE = OFF= PHANTOM = (back to the beginning)
4. Select the Delay time.
Press the DELAY button. The display changes with each press of the button, as shown below.
= DELAY 1 = DELAY 2 = DELAY 3 = (back to the beginning)
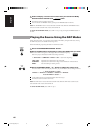
5. Set the volume to the level you normally use.
6. Press the TEST TONE button.
A test tone is emitted in the order shown below.
= LEFT = CENTER = RIGHT = REAR = (back to the beginning)
When “PHANTOM” is selected for Center Speaker mode, the test tone for the center speaker is
projected by the front speakers.
When “OFF” is selected for Center Speaker mode, no test tone is output from the center speaker.
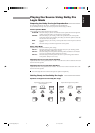
7. Adjust the level for the center speaker.
Press the CENTER LEVEL + or – button. Set the level so that it is about the same as the level from
the front speakers.
You cannot adjust the level for the center speaker if “PHANTOM” or “OFF” is selected for Center
Speaker mode.
8. Adjust the level for the rear speakers.
Press the REAR LEVEL + or – button. Set the level so that it is about the same as the level from the
front speakers.
9. To cancel Test Tone mode.
Press the TEST TONE button again.
This completes the preparations required for using Dolby Pro Logic.
Note: The Dolby Pro Logic mode is not used with other surround modes. When the Dolby Pro Logic
mode is turned on, the other surround mode, if used, will be turned off.
SURROUND
CONTROL
SURROUND
CENTER
MODE
7
DELAY
1
TEST
TONE
56
CENTER
LEVEL
89
REAR
LEVEL
1
TEST
TONE
2
PRO
LOGIC
CA-TD77R[EF]/EN/p1-25 97.7.24, 3:17 PM18