


71
Operating JVC’s Audio/Video Components
You can operate JVC’s audio and video components with this receiver’s remote control, since control signals for JVC
components are preset in the remote control.
Operating Audio Components
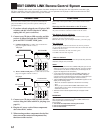
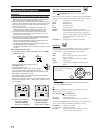
Tuner
You can always perform the following operations:
FM/AM : Tunes in to the last station of the last
selected band. Each time you press the
button, the band alternates between FM
and AM.
After pressing FM/AM, you can perform the following operations:
1 – 10, +10 : Selects a preset channel number directly.
For channel number 5, press 5.
For channel number 15, press +10, then 5.
For channel number 20, press +10, then 10.
TUNING UP/DOWN : Tunes in to stations.
FM MODE : Changes the FM reception mode.
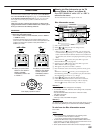
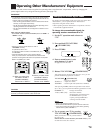
Sound control section (Amplifier)
You can always perform the following operations:
THX : Selects the THX modes.
SURROUND : Selects the Surround modes
EX/ES/7.1 : Selects the 7.1-channel reproduction
modes.
DSP : Selects the DSP modes.
SURR/DSP OFF : Deactivates the THX/Surround/DSP
modes.
ANALOG DIRECT : Turns on or off Analog Direct.
ANALOG/DIGITAL INPUT : Selects the analog/digital inputs.
CC CONVERTER : Turns on or off CC Converter.
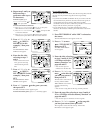
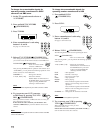
After pressing SOUND, you can perform the following operations:
TEST : Turns on or off the test tone output.
FRONT•L then LEVEL +/– : Adjusts the left front speaker
channel output level.
FRONT•R then LEVEL +/–: Adjusts the right front speaker
channel output level.
SUBWFR then LEVEL +/– : Adjusts the subwoofer output level.
CENTER then LEVEL +/– : Adjusts the center speaker channel
output level.
SURR•L then LEVEL +/– : Adjusts the left surround speaker
channel output level.
SURR•R then LEVEL +/– : Adjusts the right surround speaker
channel output level.
SURR BK•L then LEVEL +/– :
Adjusts the left surround back
speaker channel output level.
SURR BK•R then LEVEL +/– :
Adjusts the right surround back
channel speaker output level.
EFFECT : Selects the effect level.
LIVENESS : Selects the liveness.
Notes:
• After adjusting sounds, press the corresponding source selecting
button to operate your target source by using the 10 keys;
otherwise, the 10 keys cannot be used for operating your target
source.
• When you press LEVEL + or LEVEL –, the corresponding speaker
name appears on the remote’s display.
IMPORTANT:
To operate JVC’s audio components using this remote control:
• You need to connect JVC’s audio components through the COMPU
LINK (SYNCHRO) jacks (see page 61) in addition to the
connections using cables with RCA pin plugs (see page 11).
• Aim the remote control directly at the remote sensor on the
receiver.
• To operate a source with the remote control, the source must be
selected using source selecting buttons on the remote control.
• To operate the cassette deck or MD recorder using the COMPU
LINK remote control system, set the source name correctly. (See
page 27.)
• Refer also to the manuals supplied with your components.
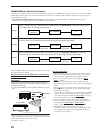
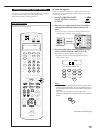
When using the remote control:
–Set ZONE 1/ZONE 2 (LEARN/TRANSMIT) selector to “ZONE 1” or
“ZONE 2” correctly.
–Check the indication shown on the remote’s display when you press
a button—this indicates the remote control operation mode together
with multi-room operation mode (either ZONE 1 or ZONE 2) for a
while.
–The CONTROL button can change the remote control operation
mode without changing the source.
Each time you press the button, the remote control operation mode
changes in the sequence—
VCR1 = TAPE = CDR = CD DISC =
(back
to the beginning).
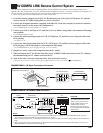
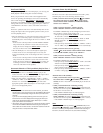
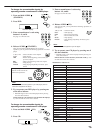
Ex.When you press FM/AM
with ZONE 1/ZONE 2
(LEARN/TRANSMIT)
selector set to “ZONE 1.”
Ex.When you press FM/AM
with ZONE 1/ZONE 2
(LEARN/TRANSMIT)
selector set to “ZONE 2.”
ZONE 2
TRANSMITLEARN
ZONE 1
ON/OFF ON/OFF
STANDBY/ON STANDBY/ON
STANDBY
TV/CATV/DBS
VCR 1
ON
ZONE 2
TRANSMITLEARN
ZONE 1
ZONE 2
ZONE 1
ZONE 1
ON/OFF ON/OFF
STANDBY/ON STANDBY/ON
STANDBY
TV/CATV/DBS
VCR 1
ON
ZONE 2
TRANSMITLEARN
ZONE 1
ZONE 2
ZONE 1
ZONE 2
ZONE 2
TRANSMITLEARN
ZONE 1