


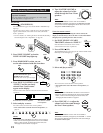


29
Zone 2 (Sub-room) Operations
This section explains only the operations used when you play a sound source in Zone 2.
See pages 22 to 28 for the Zone 1 operations.
• Before performing the Zone 2 operations, it is recommended to finish the basic settings on pages 35 to 44.
IMPORTANT:
Check the following before or while using the buttons and controls.
For Zone 2 operations:
The ZONE 2 ON/OFF lamp on the unit is lit.
• When using the unit:
–“ZONE 2” is shown in the main display.
–Press DOOR DOWN to use the buttons inside the
front door.
To close the front door, press DOOR UP.
• When using the remote control:
When operating the receiver using the remote control, the
display on the unit always shows the Zone 1 source
information though you are operating it for the Zone 2
source.
–Set the ZONE 1/ZONE 2 (LEARN/TRANSMIT) selector to “ZONE 2.”
–Check the indication shown on the remote’s display when you
press a button—this indicates the remote control operation mode
together with multi-room operation mode (either ZONE 1 or
ZONE 2) for a while.
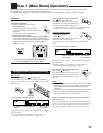
Turning the Power On and Off (Standby)
and Selecting the Zone 2 Operations
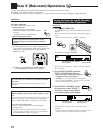
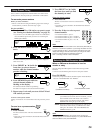
On the unit:
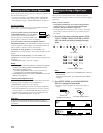
1. Press (STANDBY/ON).
The STANDBY lamp goes off, and the ZONE 1 ON/OFF lamp
lights up.
The front door moves down so that the source selecting buttons
appear.
• The unit is now activated only for Zone 1 operations.
The currently selected speakers 1 and/or 2 indicator(s) light(s)
up on the display.
2. Press ZONE 2 ON/OFF so that the
ZONE 2 ON/OFF lamp lights up.
• When connecting the Zone 2 front speakers to
the FRONT 2/ZONE 2 SPEAKERS
terminals, see also “w Setting the Zone 2/Speakers 2
Usage—ZONE 2/SPEAKER 2” on page 43, and “Activating
the Zone 2 Front Speakers” on page 32.
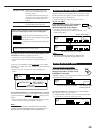
3. Press ZONE 2 CONTROL (inside
the front door) so that “ZONE 2”
and the previously selected Zone 2
source name appear on the display.
Now the buttons and controls on the unit work for Zone 2
operations.
• Each time you press the button, the buttons and controls on the
unit are activated or deactivated for Zone 2 operations.
The volume
level appears.
The last Zone 1 source is activated.
STANDBY/ON
STANDBY
L
ANALOG
SPEAKERS
VOLUME
1
SUBWFR
R
dB
dB
ZONE 2
CONTROL
ZONE 2
ON/OFF
ZONE 1
ON/OFF
The Zone 2 volume
level appears.
The last Zone 2
source appears.
SPEAKERS
VOLUME
ZONE 2
1
dB
dB
For those who connect the Zone 2 front speakers to the
ZONE 2 PREOUT jacks through another amplifier (see page
19)
You have to determine how to adjust the volume level through the
Zone 2 front speakers. (See “w Setting the Zone 2/Speakers 2
Usage—ZONE 2/SPEAKER 2” on page 43 for more details.)
To use the Zone 2 front speakers
1 Turn on the other amplifier connected to the ZONE 2
PREOUT jacks.
2 Adjust the volume level through the Zone 2 front speakers
either on the other amplifier or on this receiver (depending on
the ZONE2PREOUT setting—see page 43).
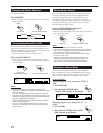
DOOR
DOWN
To use the Zone 2 TV (connected to the ZONE 2 MONITOR
OUT jack)
Turn on the TV and select the correct input for this receiver
manually.
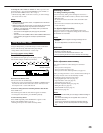
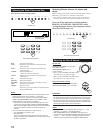
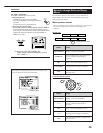
Ex.When you press FM/AM with ZONE 1/ZONE 2
(LEARN/TRANSMIT) selector set to “ZONE 2.”
ON/OFF ON/OFF
STANDBY/ON STANDBY/ON
STANDBY
TV/CATV/DBS
VCR 1
ON
ZONE 2
TRANSMITLEARN
ZONE 1
ZONE 2
ZONE 1
ZONE 2
ZONE 2
TRANSMITLEARN
ZONE 1
The last Surround/THX/DSP
mode appears.