


9
IMPORTANT:
After connecting the speakers, set the speaker setting
information properly:
• To obtain the best possible Surround/THX/DSP effect in Zone 1,
see “Basic Settings” on pages 35 to 44.
• To connect the speakers to the FRONT 2/ZONE 2 SPEAKERS
terminals, set the speaker usage correctly.
(See “w Setting the Zone 2/Speakers 2 Usage—ZONE 2/
SPEAKER 2” on page 43.)
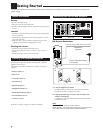
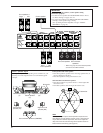
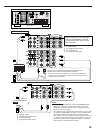
Front speakers 1
Right / Left
Right / Left
Surround back
speakers*
Right / Left
Front speakers 2
Subwoofer
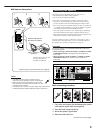
Front speakers and center speaker
• Place these speakers (position of the mid-range speaker units) at
the same height from the floor.
• Place these speakers aiming at the listener’s ears.
Surround and surround back speakers
• Place these speakers at a position which is 1 meter higher than
the listener’s ears.
• Point these speakers down aiming at the listener’s ears.
Zone 1 speaker layout
Ideal speaker layout varies depending on the conditions of your
listening room. The diagram below is a recommended typical
example.
RIGHT
LEFT
+
–
+
–
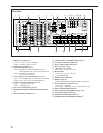
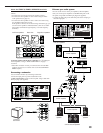
CAUTION :
SPEAKER
IMPEDANCE
FRONT 1 SPEAKERS
FRONT 2 /
ZONE 2 SPEAKERS
RIGHT
LEFT
CENTER
SPEAKER
RIGHT
LEFT
RIGHT
LEFT
SURROUND BACK
SPEAKERS
SURROUND
SPEAKERS
816
FRONT 1 AND 2
/ ZONE 2:
416
FRONT 1 OR 2:
816
CAUTION : SPEAKER IMPEDANCE
Center speaker
Left front speaker(s)
(L)
Right front speaker(s)
(R)
Center speaker
(C)
Surround back speakers (LSB/RSB)
Left surround
speaker (LS)
Right surround
speaker (RS)
Note:
Ideal speaker layout requires that all speakers be placed at the
same distance from the listener. However, since in some places it
may be difficult to fulfil this requirement, this unit can adjust the
delay time so that the sounds through all the speakers reach the
listener with the same timing. (See page 40.)
*
When using only one surround back speaker,
connect it to the LEFT terminals.
Right / Left
Surround speakers
Subwoofer
C
LR
LS RS
LSB
RSB
30˚
90˚
60˚ 60˚
90˚
30˚