


12
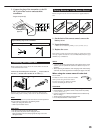
External 7.1-channel
output component
IMPORTANT:
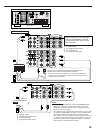
This receiver is equipped with the following video jacks—composite
video, S-video and component video jacks. You can use any of the
three to connect a video component
However, observe the following points when make connections:
• Composite video signals and S-video signals can be converted
into each other, and can be also converted into component
signals. So incoming signals of both types can be emitted through
all video output jacks. (If both signals are used, the unit
automatically gives priority to S-video signals.)
— Pictures may be distorted if the signals are converted. If this
happens, connect the playback source component and TV using
the cords of the same type.
• When the recording components and this unit are connected
using the video cords or S-video cords, playback components
and this unit need to be connected using the cords of the same
type.
• Component signals cannot be converted. So incoming signals of
this type can be emitted only through the component output jacks.
Notice: Pictures through the video components only
connected to the component input jacks on the rear of this unit
cannot be viewed in Zone 2.
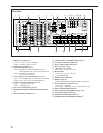
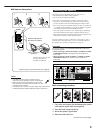
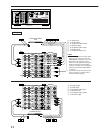
Å To left/right front channel output
ı To LFE channel (subwoofer) output
Ç To left/right surround back channel output
Î To left/right surround channel output
‰ To center channel output
EXT 7.1CH IN
R
L
RIGHT
LEFT
SURR
BACK
SUB
WOOFER
SURR
FRONT
CENTER
AUDIO
A B C
D E
R
L
R
L
R
L
Decoder
(or DVD player)
How to view the pictures through an external component
connected to the EXT 7.1CH IN (audio input) jacks
The EXT 7.1CH IN jacks do not have any corresponding video input
jack on the rear. You have to use one of the following methods to
view the pictures through the external component.
• Connect the video output jack on the external component directly
to the TV, and select the connected input on the TV.
• Connect the video output jack on the external component to any
one of unused video input jacks on the rear, then...
1. Select that video input as the video source.
2. Select “EXT 7.1CH” as the audio source.
(See “Selecting different sources for picture and sound”
on page 24).
Video component connections
Use cables with RCA pin plugs (not supplied).
Connect the white plug to the audio left jack, the red plug to the
audio right jack, and the yellow plug to the video jack.
• If your video components have S-video (Y/C-separation) and/or
component video (Y, P
B, PR) jacks, connect them using an S-video
cable (not supplied) and/or component video cable (not supplied).
By using these jacks, you can get better picture quality—in the
order: Component video > S-video > Composite video.
Note:
The ZIST circuit (see page 1) is incorporated for the EXT 7.1CH IN jacks
to clarify the audio signals independently from the video input circuit.
However, if the external component connected to the EXT 7.1CH IN jacks
and this receiver are not connected using video cords (composite, S-
video, or component), noise may happen to be generated when listening
to this external component.
In this case, connect the video output jacks on the external component
and unused video input jacks on this receiver.
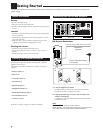
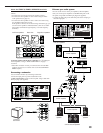
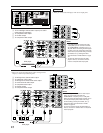
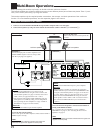
Video camera
The VIDEO input terminals on the front panel are convenient when
connecting and disconnecting the component frequently.
• When you do not use the VIDEO input terminals, attach the front
terminal cover (supplied) to these jacks to protect them from dust.
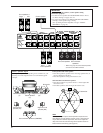
Video Input Converted Video Output
Component
S-video
Video (composite)
Component
S-video
Video (composite)
• When attaching the front
terminal cover
• When removing the cover
To composite video
output
To S-video output
To optical digital output
To audio output
Video camera
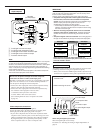
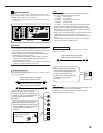
When using the digital input terminal
Select the digital input mode correctly.
For details, see “Selecting the Analog or Digital Input Mode” on
page 25.
S-VIDEODIGITAL
VIDEO L—AUDIO—R
VIDEO
R
L
S-VIDEODIGITAL
VIDEO L—AUDIO—R
VIDEO