


23
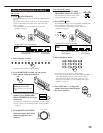
Canceling the Zone 1 Operations
To stop Zone 1 operations and sounds from the Zone 1 speakers,
press ZONE 1 ON/OFF so that the ZONE 1 ON/OFF lamp goes off.
The currently selected front speakers indicator(s) also go(es) off
from the display (no sound will be heard in Zone 1).
To use this receiver for Zone 1 operations again, press
ZONE 1 ON/OFF again (the ZONE 1 ON/OFF lamp lights up).
The front speakers indicator(s) previously selected light(s) up.
Now the buttons and controls on the unit work for Zone 1
operations.
Notes:
• If you have turned off Zone 1 with the volume level set at more than
level “–35 dB,” the volume level will be automatically set at level
“–35 dB” next time you turn on Zone 1.
• If “TURN ON ZONE1 OR ZONE2” appears on the display, press
ZONE 1 ON/OFF or ZONE 2 ON/OFF to listen to the sound in Zone
1 or in Zone 2; otherwise, the receiver will turn off after about 1
minute.
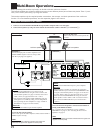
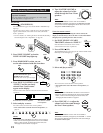
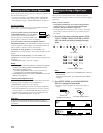
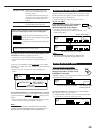
Selecting the Zone 1 Source to Play
Press one of the source selecting buttons.
• The selected source name and Surround/THX/DSP mode also
appear on the display.
DVD : Selects the DVD player.
DVD MULTI :
Selects the DVD player for viewing a digital video
disc using the analog discrete output mode (5.1-
channel reproduction).
To use the DVD MULTI playback mode, see page 60.
VCR 1 : Selects the video component connected to the VCR 1
IN jacks.
VCR 2 : Selects the video component connected to the VCR 2
IN jacks.
TV/DBS : Selects TV sound (or the DBS tuner).
VIDEO :Selects the video component connected to the VIDEO
jacks.
CD* : Selects the CD player.
PHONO* : Selects the turntable.
TAPE/MD
* :Selects the cassette deck (or the MD recorder).
CDR* : Selects the CD recorder.
FM/AM* : Selects the tuner.
Each time you press the button, the band alternates
between FM and AM.
EXT 7.1CH
: Selects the external component connected to the EXT
7.1CH IN jacks.
To use the EXT 7.1CH playback mode, see page 60.
Notes:
• When connecting an MD recorder (to the TAPE/MD IN jacks), and a
DBS tuner (to the TV SOUND/DBS IN jacks), change the source
names shown on the display. For details, see “Changing the Source
Name” on page 27.
• When you press one of the audio source selecting buttons on the
remote control marked with an asterisk (
*
), the receiver
automatically turns on. If you turn on the receiver with the ZONE 1/
ZONE 2 (LEARN/TRANSMIT) selector set to “ZONE 2,” press
ZONE 1 ON/OFF to activate Zone 1 operations.
– If you press one of the audio source selecting buttons on the
remote control with the ZONE 1/ZONE 2 (LEARN/TRANSMIT)
selector set to “ZONE 1” while the receiver is turned on but Zone
1 is turned off, Zone 1 is turned on with the audio source
selected.
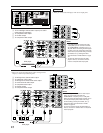
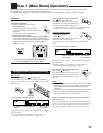
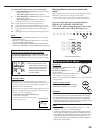
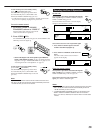
Speaker and signal indicators on the display
By checking the following indicators, you can easily confirm which
speakers you are activating and which signals are coming into this
receiver.
What speaker indicators light depends on the speaker setting
(for details, see “1 Setting the Speakers—SPEAKER
SETTING” on page 38).
• The frames of “L,” “C,” “R,” “LS,” “RS, ” and “SB” light up,
when the corresponding speakers are set to “LARGE” or
“SMALL” and when the speaker is required for the Surround/
THX/DSP mode currently selected.
• When “SUBWOOFER” is set to “YES,”
SUBWFR
lights up.
• All three frames on the row of “SB” are not used at the same time.
When “SURR BACK OUT” is set to “2SPK,” the left and the right
ones are used. When it is set to “1SPK,” the middle one is used.
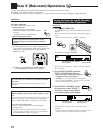
From the remote control
ZONE 1
ON/OFF
ON/OFF
ZONE 1
On the unit
Signal indicators
Speaker indicators
SUBWFR
LCR
LS RS
LFE
LCR
SLS
SB
RS
SB
DVD DVD MULTI VCR 1 VCR 2 TV/DBS CDVIDEO PHONO TAPE/MD CDR FM/AM EXT 7.1CH
On the unit
DVD
DVD MULTI
CD
CDR
PHONO
TAPE/MD
EXT 7.1CH
VCR 1 VCR 2
FM/AMVIDEOTV/DBS
From the remote control
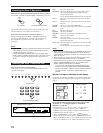
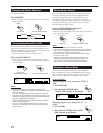
Selected source name
L
ANALOG
SPEAKERS
VOLUME
1
SUBWFR
R
dB
dB
The current Surround/THX/DSP mode appears.