


26
Attenuating the Input Signal
When the input level of the playing source is too high, the sounds
will be distorted. If this happens, you need to attenuate the input
signal level to prevent sound distortion.
• You have to make this setting for analog each source.
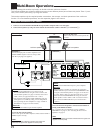
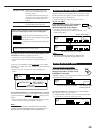
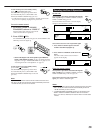
On the unit ONLY:
Press and hold INPUT ATT (inside the
front door) so that the INPUT ATT
indicator lights up on the display.
• Each time you press and hold the button, the
input attenuator mode turns on (“INPUT ATT ON”) or off
(“INPUT ATT OFF”).
Notes:
• This effect is applied to only the Zone 1 analog sources.
• This function is not valid when Analog Direct is in use.
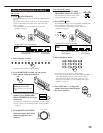
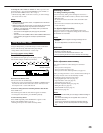
Muting the Zone 1 Sound
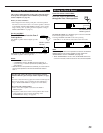
From the remote control ONLY:
Press MUTING to mute the sound
through all speakers in Zone 1 and
headphones connected.
“MUTING” appears on the display and the volume turns off (the
VOLUME level indicator goes off).
To restore the sound, press MUTING again so that “MUTING
OFF” appears on the display for a while.
• Turning MASTER VOLUME on the unit or pressing VOLUME
+/– on the remote control also restores the sound.
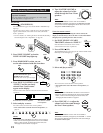
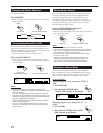
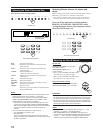
DIGITAL AUTO : Select this for the digital input mode.
The receiver automatically detects the
incoming signals.
The DGTL AUTO indicator lights up on
the display, and the digital signal format
indicators for the detected signals also
light up.
ANALOG : Select this for the analog input mode.
The ANALOG indicator lights up.
When selecting “DIGITAL AUTO,” the following indicators
indicate the digital signal format of the incoming signal.
LINEAR PCM
: Lights up when Linear PCM signals come in.
DIGITAL
: Lights up when Dolby Digital or Dolby Digital
EX signals come in.
: Lights up when DTS or DTS-ES signals come
in.
No indicator lights up when the receiver cannot recognize the
digital signal format of the incoming signals.
When playing software encoded with the Dolby Digital or DTS
Surround, the following symptoms may occur:
• Sound does not come out at the beginning of playback.
• Noise comes out while searching for or skipping chapters or
tracks.
In this case, press RIGHT (or LEFT)
on the unit to select “DGTL
DOLBY D” or “DGTL DTS” while “DIGITAL AUTO” still remains
on the display.
• Each time you press the button, the input mode changes as
follows:
When “DOLBY DIGITAL” or “DTS SURROUND” is selected,
the DGTL AUTO indicator goes off, and the corresponding digital
signal format indicator (
DIGITAL
or ) lights up on the
display.
• If the incoming signal does not match the selected digital signal
format, the frame of the selected indicator will flash.
Note:
When you turn off the power or select another source, “DOLBY
DIGITAL” and “DTS SURROUND” settings are canceled and the
digital input mode is automatically reset to “DIGITAL AUTO.”
INPUT MODE
/ INPUT ATT
dB
L
ANALOG
SPEAKERS
VOLUME
1
SUBWFR
R
dB
L
ANALOG
SPEAKERS
VOLUME
INPUT
ATT
1
SUBWFR
R
dB
Ex. When the source is “VIDEO.”
INPUT ATT indicator
dB
L
DGTL AUTO
DIGITAL
SPEAKERS
VOLUME
1
SUBWFR
C R
LFE
RSLS
dB
DIGITAL AUTO
DGTL DOLBY D
(DOLBY DIGITAL)
DGTL
DTS
(DTS SURROUND)
MUTING
L
ANALOG
SPEAKERS
1
SUBWFR
R
Ex. When the source is “VIDEO.”
dB
L
ANALOG
SPEAKERS
VOLUME
1
SUBWFR
R
The VOLUME level
indicator goes off.