


55
Activating the Surround and THX Modes
Perform the basic settings and adjustments using the Setup and
Adjustment Menus first (see pages 35 to 50).
Activating the Surround mode and the THX mode for a source
automatically recalls the memorized settings and adjustments.
IMPORTANT:
Check the following before or while using the buttons and controls.
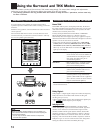
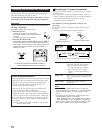
For Zone 1 operations:
The ZONE 1 ON/OFF lamp on the unit is lit.
• When using the unit:
–“ZONE 2” is not shown in the main display.
–Press DOOR DOWN to use the buttons inside the
front door.
To close the front door, press DOOR UP.
• When using the remote control:
–Set the ZONE 1/ZONE 2 (LEARN/TRANSMIT) selector to “ZONE 1.”
–Check the indication shown on the remote’s display when you
press a button—this indicates the remote control operation mode
together with multi-room operation mode (either ZONE 1 or
ZONE 2) for a while.
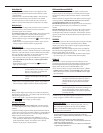
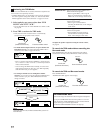
Activating the 7.1-channel reproduction
For multi-channel digital software, you can activate the 7.1-channel
reproduction mode.
• Once you have set 7.1-channel reproduction mode, it is stored in
memory and will be called up whenever you activate the Surround
mode or THX mode which the memorized 7.1-channel
reproduction mode can be applied to.
Press EX/ES/7.1 to select an appropriate setting for your
enjoyment.
The currently selected 7.1-channel reproduction mode appears on
the display.
• Each time you press the button, it changes as follows:
EXES7.1 AUTO : According to the incoming signal, an
appropriate Surround mode is applied.
• For 6.1-channel encoded software,
7.1-channel reproduction is applied.
• For 5.1-channel (or less) encoded
software, 5.1-channel reproduction is
applied.
EXES7.1 ON : Select to apply 7.1-channel reproduction to
both 5.1-channel and 6.1-channel encoded
software.
EXES7.1 OFF : Select to cancel the 7.1-channel
reproduction.
Notes:
• When an analog or digital 2-channel source is playing with
Surround activated, you can adjust the 7.1-channel reproduction
mode and store the setting, but it will not affect the current
source.
• In the following cases, the EX/ES/7.1 button does not work.
(“NO SURRBACK” appears on the display.)
– When “SURR BACK SP” is set to “NONE” (see page 38), or
– When “SPEAKER 2” is set to “BI-AMP OUT” (see page 44)
• When the Zone 2 speakers are activated, the EX/ES/7.1 button
does not work. (“EXES7.1 OFF” appears on the display.)
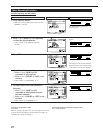
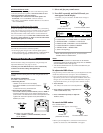
DOOR
DOWN
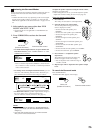
Ex.When you press THX with ZONE 1/ZONE 2
(LEARN/TRANSMIT) selector set to “ZONE 1.”
ZONE 2
TRANSMITLEARN
ZONE 1
ON/OFF ON/OFF
STANDBY/ON STANDBY/ON
STANDBY
TV/CATV/DBS
VCR 1
ON
ZONE 2
TRANSMITLEARN
ZONE 1
ZONE 2
ZONE 1
ZONE 1
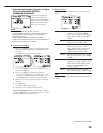
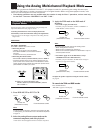
EX/ES/7.1
On the unit
(inside the front door)
EX/ES/7.1
From the remote control
dB
L
DGTL AUTO
DIGITAL
SPEAKERS
VOLUME
1
SUBWFR
C R
LFE
RSLS
EXES7.1 ON
EXES7.1 OFF
EXES7.1 AUTO
About Dialog Normalization
Dialog Normalization is one of the standard functions for Dolby
Digital and its level is encoded together with the audio signals.
With this function, the sound output level of Dolby Digital
software can be kept at almost the same level even if the
recording levels differ among software.
THX also has the same function and its own standard level,
which is different from that for Dolby Digital.
If you see a message in the main display that shows “DIAL.
NORM: XX (number)” this means that the source material that
you are listening to has been encoded at a higher or lower level
than normal. To keep the volume level consistent from program
to program, adjust the volume control by the amount (XX) in
this message.
• Ex: If the display reads “DIAL. NORM: +4”, turn down the
volume control by 4 dB.