


24
DriveRack
®
DriveRack® User Manual
Section 3
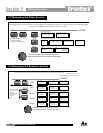
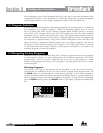
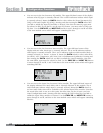
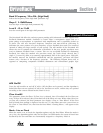
• You are now in the Pre-Crossover EQ module. The upper left-hand corner of the display
indicates what EQ type is currently selected. The A and B indicators indicate which input
is currently selected. Rotate the DATA wheel to select either the 9-band Parametric EQ
(PEQ) or 28 band Graphic EQ (GEQ). Pressing and then rotating the DATA wheel lets
you link or unlink the input EQ modules as desired. Note that the same EQ types must
be selected to link. If you plan to use the Auto EQ feature, you must select a GEQ type
EQ here. Use the PREV PG and NEXT PG buttons to move through A and B and then
to the next module screen which will appear something like this:
GEQ
Select
Link/Unlink
<DATA> - SELECT CHARACTER
<PREV/NEXTPG> - LEFT/RIGHT
<STORE>-EDIT/<UTIL>-EXIT
NAME: Output Ch2
CONFIGURATION ERROR!
One or more outputs
have duplicated
channels.
M
6
4
2
5
3
1
M
A
B
Program 1
8
FACT
GEQ
GEQ
G
G
A
B
COMP
Select
Link/Unlink
A
B
2
N
C
F
N
S
D
D
P2X6 PP
C
C
F
1
MONO DLY 1.3
10 ms Unused
Select
Link/Unlink
A
B
D
D
1X1 FILTER
Select
Route
2
A
A
3
4
A
B
5
6
A
A
2
POST EQ
Link/Unlink
2
3
4
5
6
2P
P
P
P
P
P
LIMITER
Select
Link/Unlink
2
3
4
5
6
2L
L
L
L
L
L
MONO DLY 20 MS
810 ms Unused
Select
Link/Unlink
2
3
4
5
6
2D
D
D
D
D
D
OUTPUT CH2
Route
NAME Output Ch2
2
3
4
5
6
2
<STORE>-EDIT NAME
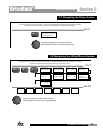
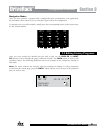
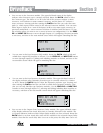
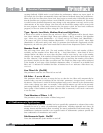
• You are now in the Pre-Crossover Insert module. The upper left-hand corner of the
display indicates what Insert type is currently selected. The A and B indicators indicate
which input is currently selected. The 1 and 2 indicators indicate which module block is
currently selected (i.e. Insert 1 or Insert 2). Rotate the DATA wheel to select either Wire
(no effect), AGC, Compressor, AFS, Noise Gate or Subharmonic Synthesizer. Pressing and
then rotating the DATA wheel lets you link or unlink the A and B modules. Note that
the same Effect types must be selected to link. Use the PREV PG and NEXT PG buttons
to move through A and B, 1 and 2 and then to the next module screen which will appear
something like this:
GEQ
Select
Link/Unlink
<DATA> - SELECT CHARACTER
<PREV/NEXTPG> - LEFT/RIGHT
<STORE>-EDIT/<UTIL>-EXIT
NAME: Output Ch2
CONFIGURATION ERROR!
One or more outputs
have duplicated
channels.
M
6
4
2
5
3
1
M
A
B
Program 1
8
FACT
GEQ
GEQ
G
G
A
B
COMP
Select
Link/Unlink
A
B
2
N
C
F
N
S
D
D
P2X6 PP
C
C
F
1
MONO DLY 1.3
10 ms Unused
Select
Link/Unlink
A
B
D
D
1X1 FILTER
Select
Route
2
A
A
3
4
A
B
5
6
A
A
2
POST EQ
Link/Unlink
2
3
4
5
6
2P
P
P
P
P
P
LIMITER
Select
Link/Unlink
2
3
4
5
6
2L
L
L
L
L
L
MONO DLY 20 MS
810 ms Unused
Select
Link/Unlink
2
3
4
5
6
2D
D
D
D
D
D
OUTPUT CH2
Route
NAME Output Ch2
2
3
4
5
6
2
<STORE>-EDIT NAME
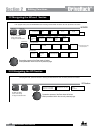
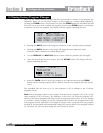
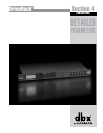
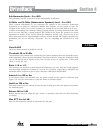
• You are now in the Input (Pre-Crossover) Delay module. The upper left-hand corner of
the display indicates how much delay time is currently allocated to this module. The A
and B indicators indicate which input is currently selected. Rotate the DATA wheel to
set how much delay time will be available to the selected Input Delay module. Note that
the actual delay time is not set at this point; the delay time can be set once you have
exited Configuration mode. Pressing and then rotating the DATA wheel lets you link or
unlink the Input Delay modules as desired. Use the PREV PG and NEXT PG buttons to
move through A and B, and then to the next module screen which will appear something
like this:
GEQ
Select
Link/Unlink
<DATA> - SELECT CHARACTER
<PREV/NEXTPG> - LEFT/RIGHT
<STORE>-EDIT/<UTIL>-EXIT
NAME: Output Ch2
CONFIGURATION ERROR!
One or more outputs
have duplicated
channels.
M
6
4
2
5
3
1
M
A
B
Program 1
8
FACT
GEQ
GEQ
G
G
A
B
COMP
Select
Link/Unlink
A
B
2
N
C
F
N
S
D
D
P2X6 PP
C
C
F
1
MONO DLY 1.3
10 ms Unused
Select
Link/Unlink
A
B
D
D
1X1 FILTER
Select
Route
2
A
A
3
4
A
B
5
6
A
A
2
POST EQ
Link/Unlink
2
3
4
5
6
2P
P
P
P
P
P
LIMITER
Select
Link/Unlink
2
3
4
5
6
2L
L
L
L
L
L
MONO DLY 20 MS
810 ms Unused
Select
Link/Unlink
2
3
4
5
6
2D
D
D
D
D
D
OUTPUT CH2
Route
NAME Output Ch2
2
3
4
5
6
2
<STORE>-EDIT NAME
Configuration Functions