


34
Connecting the AV receiver
—Continued
■
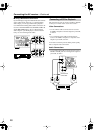
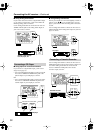
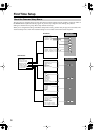
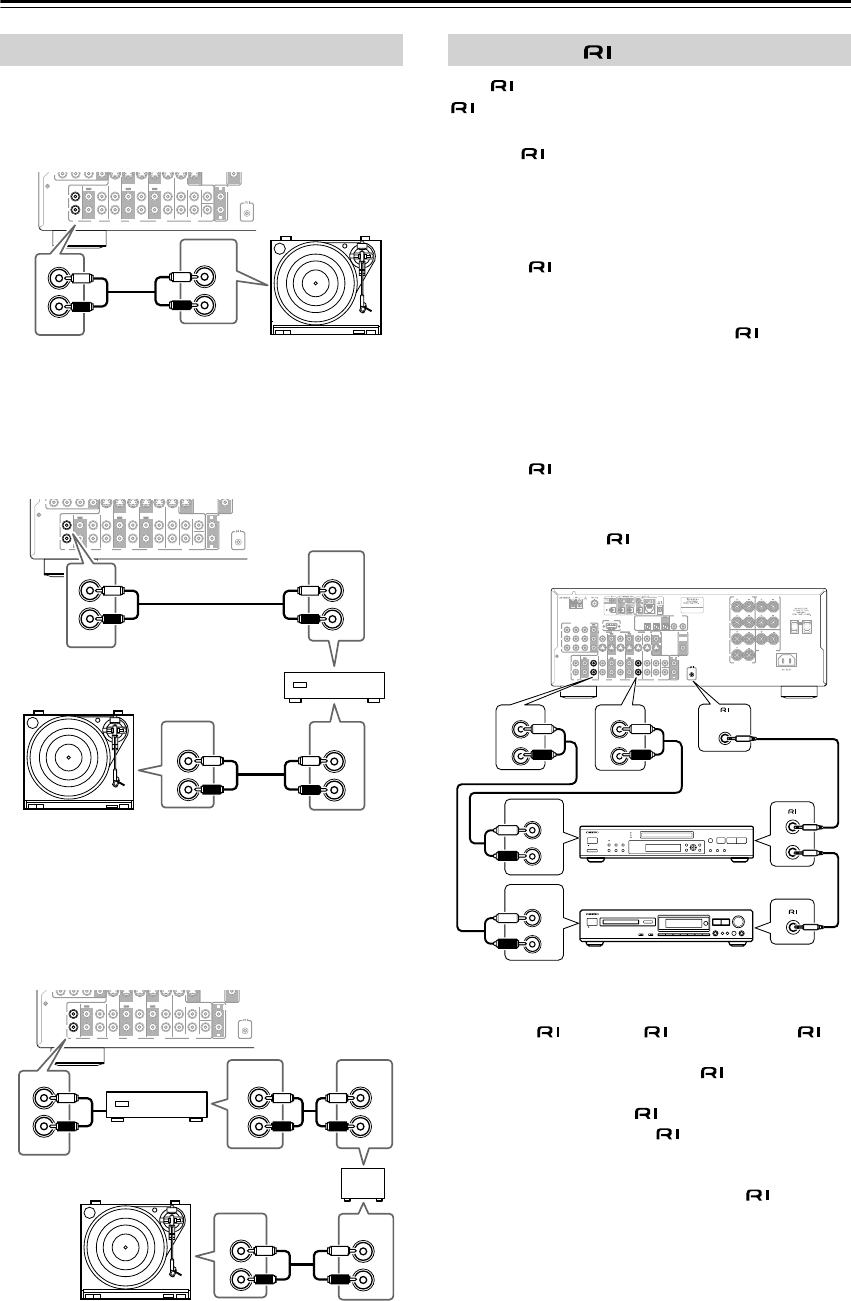
Turntable with a Built-in Phono Preamp
Use an analog audio cable to connect an unused audio
input on the AV receiver to the audio outputs on your
turntable, as shown.
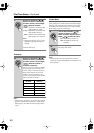
■
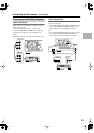
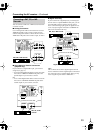
Turntable without a Built-in Phono Preamp
Use an analog audio cable to connect an unused audio
input on the AV receiver to the audio outputs on your
phono preamp, and use another analog audio cable to
connect the phono preamp’s inputs to your turntable, as
shown.
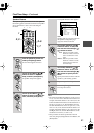
■
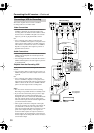
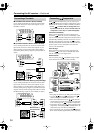
Turntable with an MC (Moving Coil) Cartridge
Use an analog audio cable to connect an unused audio
input on the AV receiver to the audio outputs on your
phono preamp. Use another analog audio cable to con-
nect the phono preamp’s inputs to your MC head amp’s
outputs. And use another analog audio cable to connect
the MC head amp’s inputs to your turntable, as shown.
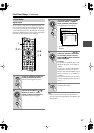
With (Remote Interactive) you can control your
-compatible Integra CD player, DVD player, and so
on with the AV receiver’s remote controller, as follows:
•To use , you must make an analog audio con-
nection between the AV receiver and the other AV
components, even if they are connected digitally.
Auto Power On/Standby
When you start playback on an AV component con-
nected via , if the AV receiver is in Standby, it will
turn on and select that AV component as the input source
automatically. Similarly, when the AV receiver is set to
Standby, all components connected via also enter
Standby. Note that this function will not work if the com-
ponent’s power cord is connected to one of the AV
receiver’s AC OUTLETS.
Direct Change
When playback is started on an AV component con-
nected via , the AV receiver automatically selects
that AV component as the input source.
Remote Control
You can control your -compatible Integra compo-
nents with the AV receiver’s remote controller.
Notes:
• Push plugs in all the way to make good connections.
• Use only cables for connections. No
cables are supplied with this AV receiver.
• Some AV components have two jacks. You can
connect either one to this AV receiver. The other jack
is for connecting more -compatible components.
• Connect the AV receiver’s jack to only Integra AV
components. Connecting to other manufacturer’s AV
components may cause them to malfunction.
• Some components may not support all functions.
Refer to the manuals supplied with your components.
Connecting a Turntable
R
L
FRONT SURR CENTER
CD
VIDEO 3 VIDEO 2 VIDEO 1
IN IN IN
OUT OUT
IN IN
OUT
TAPE
SUB
WOOFER
DVD
P
R
REMOTE
CONTROL
ZONE 2
OUT
R
L
IN
L
R
CD
AUDIO
OUTPUT
R
L
FRONT SURR CENTER
CD
VIDEO 3 VIDEO 2 VIDEO 1
IN IN IN
OUT OUT
IN IN
OUT
TAPE
SUB
WOOFER
DVD
P
R
REMOTE
CONTROL
ZONE 2
OUT
R
L
L
R
L
R
L
R
IN
CD
AUDIO
OUTPUT
AUDIO
OUTPUT
AUDIO
INPUT
Phono preamp
R
L
FRONT SURR CENTER
CD
VIDEO 3 VIDEO 2 VIDEO 1
IN IN IN
OUT OUT
IN IN
OUT
TAPE
SUB
WOOFER
DVD
P
R
REMOTE
CONTROL
ZONE 2
OUT
R
L
L
R
L
R
L
R
L
R
IN
CD
AUDIO
OUTPUT
AUDIO
OUTPUT
AUDIO
INPUT
AUDIO
INPUT
Phono preamp
MC head amp or
MC transformer
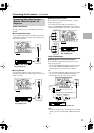
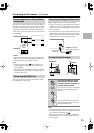
Connecting Components
R
L
R
L
FRONT
SPEAKERS
CENTER
SPEAKER
R
L
R
L
R
L
ZONE 2 SPEAKERS
SURROUND
SPEAKERS
IN 1IN 2IN 3
FRONT SURR CENTER
DVD
CD
VIDEO 3 VIDEO 2 VIDEO 1
VIDEO 3 VIDEO 2
PRE OUT
VIDEO 1
IN IN IN
OUT OUT
IN IN
OUT
OUT
TAPE
SUB
WOOFER
SUB
WOOFER
MONITOR
OUT
DVD
COMPONENT VIDEO
P
B
Y
P
R
IN
OUT
IN IN IN
OUT
REMOTE
CONTROL
ZONE 2
OUT
V
S
IN 1IN
2
OPTICAL
IN1IN2
OUT
COAXIAL
DIGITAL
RS
232
R
L
4.5
REMOTE
CONTROL
L
R
IN
L
R
L
R
AUDIO
OUTPUT
AUDIO
OUTPUT
L
R
IN
e.g., DVD player
e.g., MD recorder