


troubleshooting
technical documentation
http://www.hp.com/support/tape may have a later version
data protection
contact hp
home page
before you start
operation
cartridge care
cleaning
specifications
media compatibility
diagnostics
troubleshooting
FAQs
SCSI configuration
UNIX configuration
ordering supplies
troubleshooting
contents of this section
help diagnosing the problem
general guidelines
troubleshooting
problems with the host
computer
computer does not boot up
computer boots, but does
not recognize drive
problems with the drive
the tape drive does not
power up
all the LEDs on the front
panel blink continually
errors for which you cannot
find the cause
problems during firmware
update
drive does not go into firmware
update mode
code update failed
interpreting the LEDs
related topics
HP Library & Tape Tools
TapeAlert
firmware upgrades
help diagnosing the problem
If you experience problems using your tape drive after installation, use HP Library
& Tape Tools to help you diagnose the problem. HP Library & Tape Tools is
provided free of charge and is invaluable for solving problems with both the SCSI
bus and its attached devices. It will help resolve SCSI ID numbers and also run
some tests that may help you isolate problems.
You will also find troubleshooting information on the HP Support web site.
The HP Support web site contains links to:
● www.hp.com/support/dlt1 takes you to HP’s Customer Care web site for a
wide range of up-to-date information about your product
● www.hp.com/cpso-support/guide/psd/cscinfo.htm takes you to HP's
worldwide call center numbers
general guidelines
If you experience problems when using the tape drive, you need to isolate the
cause of the problem. For example, if you have just installed a new SCSI host bus
adapter and your system will not start, the cause of the problem is likely to be the
adapter.
When installing multiple items of hardware and software, we recommend that you
install each in turn and restart the system each time. Similarly if you have already
installed multiple devices and software and you experience problems, remove or
uninstall each in turn to establish which one is causing the problem.
Remember that the system recognizes devices during boot-up. If you swap or
connect a product when your system is running, you will need to reboot the
system. Rebooting the system will reset devices and will often resolve problems. It
is good practice to reboot every time you add a driver or install firmware.
troubleshooting
The first step in problem-solving is establishing whether the problem lies with the
cartridge, the drive, the host computer and its connections, or with the way the
system is being operated. If none of the following advice helps you solve the
problem, refer to our World Wide Web Customer Care pages on
www.hp.com/support/dlt1 or call for assistance.
problems with the host computer
Most modern SCSI host bus adapters locate and display attached devices when
the system is booting up. If the device is not detected at this stage, there is
probably a problem with the physical hardware: cables, termination, connections,
power or the HBA itself. Refer to the SCSI topic for a detailed discussion of SCSI
IDs, termination and cabling.
If your drive is found on system boot up but cannot be found in the operating
system, this is more likely to be a software problem.
computer does not boot up
Possible cause Potential solution
You have connected the tape drive
to an existing SCSI bus that has
other devices connected to it and
the SCSI address of your HP
Surestore DLT1 drive is identical to
the address used by another
device.
Make sure that each device on the SCSI
bus has a unique ID. We recommend that
the HP Surestore DLT1 tape drive is
connected to a dedicated host bus
adapter. Do not connect the drive to a disk
RAID controller as this is not supported.
You have installed an additional
SCSI host bus adapter and its
resources are clashing with an
existing adapter.
Remove the new host bus adapter and
check the server documentation
You have disconnected the power
or SCSI cable from the computer’s
boot disk during the drive
installation process.
Check that the cables to all devices are
firmly connected.
computer boots, but does not recognize the tape drive
Possible cause Potential solution
The power or SCSI cable is not
connected properly.
Check that the cables to the tape drive are
firmly connected. Ensure that the SCSI
cable is LVDS-compliant and that it does
not have any bent pins. Replace, if
necessary. (See “Ordering Information”.)
The SCSI bus may not be
terminated correctly.
1. If your HP Surestore DLT1 drive is the
last or only device on the SCSI bus, make
sure the device is properly terminated.
2. If your HP Surestore DLT1 drive is not
the last or only device on the SCSI bus,
check all SCSI cable connections and
make sure the last device on the SCSI bus
is terminated.
The tape drive’s SCSI ID address
is not unique.
Identify the SCSI IDs of existing SCSI
devices by using HP Library & Tape Tools.
Change the drive's SCSI ID. Shut down
and turn off the host server or workstation;
turn off the desktop drive. Change the
drive's SCSI ID. Turn on the host server or
workstation and desktop drive.
External drives only: the tape drive
may have been switched on after
the computer was booted up. The
computer checks for SCSI devices
only at power-on.
Switch on the tape drive, then switch the
computer off and then on again.
The SCSI adapter may be
incorrectly configured.
Check the SCSI host adapter
configuration. Refer to the SCSI host
adapter manuals for instructions.
The SCSI cable may be loose. Check both ends of the SCSI cable, both
for the desktop and internal drives.
The SCSI terminator might be
loose or missing.
1. Make sure the terminator is properly
seated on the open SCSI connector on the
rear panel of the desktop drive or on the
last device on the SCSI bus.
2. Make sure an LVD or SE terminator is in
place on the end of the SCSI ribbon cable
for the internal drive.
The SCSI terminator might not be
at the end of the SCSI bus or more
than two terminators might be
present on the SCSI bus.
Make sure the terminators are placed only
at each end of the SCSI bus--one at the
host adapter and one on the last device on
the bus, both internal and external.
The SCSI host adapter might be in
a defective expansion slot.
Move the SCSI host adapter to a different
expansion slot.
The SCSI bus might be too long. Make sure the total length of the SCSI bus
does not exceed the ANSI SCSI standard
of 3 meters (10 feet) for an SE bus, 12
meters (40 feet) for an LVD SCSI bus with
multiple devices, or 25 meters (82 feet) for
an LVD SCSI bus with a single device.
problems with the drive
tape drive does not power up
Possible cause Potential solution
The power cable is not connected
properly.
Check that the cables to the tape drive are
firmly connected.
Make sure that the power cable is firmly
connected.
● For internal drives, try another
power connector.
● For external drives, the power on/off
switch incorporates a green LED. If
this is not on, check the power cable
connection and replace the cable if
necessary. You can use the power
cable from your monitor or another
device to check that the connection
is working.
If the power supply is present and all LEDs
remain off, call for assistance.
The self-test fails (All three LEDS
flashing.)
If there is a cartridge in the drive, remove
it. Power down the drive and power it up
again. If the self-test still fails, call for
assistance.
all the LEDs on the front panel blink continually
Possible cause Potential solution
An internal drive fault has occurred. 1. Press and hold the Eject button for 6
seconds to reset the drive.
2. Turn the drive off and then on again. If
the drive is a HP Surestore DLT1 internal
drive, shut down and turn off the host
server or workstation, then turn it back on
and allow it to boot.
3. Call technical support if Power-On Self-
Test (POST) continues to fail.
errors for which you cannot find the cause
Possible cause Potential solution
The AC power source may not be
properly grounded.
(HP Surestore DLT1e desktop
drive only.)
1. Plug the HP Surestore DLT1e Desktop
drive's power cable into a power outlet on
the same circuit as the host server or
workstation.
2. Plug the HP Surestore DLT1e Desktop
Drive's power cable into a different power
outlet.
problems during firmware update
drive does not go into firmware update mode
Possible cause Potential solution
There is a DLTtape cartridge in the
drive.
Remove the cartridge from the drive and
repeat the update process.
The drive and its controller
hardware are not communicating
properly.
The drive's hardware may be damaged
and must be repaired. Refer to our World
Wide Web Customer Care pages on
www.hp.com/support/dlt1 or call for
assistance.
code update failed
Possible cause Potential solution
1. The cartridge is not a valid code
update cartridge
2. The cartridge does not contain a
valid code update image file.
Obtain a valid code update cartridge and
repeat the update process.
The cartridge contains a valid code
update image file, but the flash
EEPROM programming process
fails.
The drive's controller hardware is probably
damaged and must be replaced. The drive
resets and runs Power-On Self-Test
(POST) which fails if the flash EEPROM
does not contain a valid code image. If this
occurs, you must repair the drive before
using it.
Refer to our World Wide Web Customer
Care pages on www.hp.com/support/dlt1
or call for assistance.
interpreting the LEDs
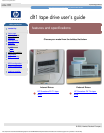
The HP Surestore DLT1 tape drive has three LEDs (light emitting diodes) on the
front panel which indicate drive status. The Ready switch is illuminated when
power is switched on.
The tape drive performs a power on Power-On Self-Test (POST) whenever power is
applied or the drive is reset. The test takes several seconds to complete, after which
the drive is ready to use. The following takes place during POST:
1. The LEDS turn on all at once and then turn off.
2. If a cartridge is loaded, the Ready LED flashes during initialization and
remains illuminated after POST.
3. If there is no cartridge loaded, all LEDs turn off after POST.
Use the following table to interpret the LED sequences and the appropriate action to
take.
Symptom Action
Drive fails to execute power-on
self-test. LEDs remain off.
Check power is being supplied to the drive.
For external drives, the power on/off switch
incorporates a green LED. If this is not on, check
the power cable connection and replace the cable
if necessary. You can use the power cable from
your monitor or another device to check that the
connection is working.
For internal drives try another power connector.
If the power supply is present and all LEDs
remain off, contact the HP Customer Care
Center.
The Caution LED is illuminated. The drive may need cleaning. Load the DLT1
cleaning cartridge.
© 2000, Hewlett-Packard Company
file:///C|/Documents%20and%20Settings/topher.COL-SPRINGS/Desktop/manual/document/dlt1/user/reseller/eng/trouble.htm [12/3/2001 7:50:40 AM]