


pitch (if any) that is being applied to the track.
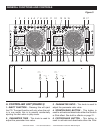
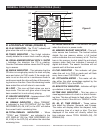
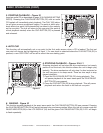
29. BANK BUTTONS 1-3 - These button are
used to store either three (3) cue points or three
(3) samples. Each Bank Button can store either
a sample or a cue point. 6 sec. samples each
bank.
30. SAMPLER BUTTON - This is used to acti
-
vate the sampler function. When this function
is activated a created sample will play in a con
-
tinuos loop, until the sampler is deactivated.
31. MEMORY BUTTON - This button allows you
to program up to 3 cue points or three samples
in to the three FLASH BUTTONS (29). The sam
-
ples or cue point can then be recalled at any
time even when the disk has been removed and
reloaded at a later time.
32. PLAY/PAUSE BUTTON - Each press of the
PLAY/PAUSE BUTTON causes the operation to
change from play to pause or from pause to play.
While in play mode the green play L.E.D. will
glow, and while in pause mode the green play
L.E.D. will flash.
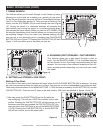
33. CUE - Pressing the
CUE button during play-
back immediately pauses playback and returns
the track to the last set cue point (see setting a
CUE POINT, page 18). The red CUE L.E.D. will
glow when the unit is in cue mode The L.E.D. will
also flash every time a new CUE POINT is set.
The CUE button can be held down to momen
-
tarily play the CD. When you release the CUE
button it instantly returns to the CUE POINT. You
can also tap the CUE button to create a BOP
GENERAL FUNCTIONS AND CONTROLS (Cont.)
©American Audio® - www.americanaudio.us - DCD-PRO1000™ Instruction Manual Page 12
EFFECT (for definition of BOP EFFECT, see page
24).
34. LCD DISPLAY - This high quality LCD display
indicates all the functions, as they are occurring.
This display is viewable at several comfortable
angles (see page 8). The display ICONS will be
explained on page 15.
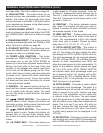
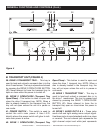
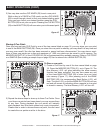
B. REMOTE CONTROL - REAR
35. CHANNEL 1 REMOTE JACK - Connect the
supplied 8 pin din cable from this jack to the play
-
er's channel 1 remote connector. This will allow
you to control the functions of player 1.
36. CHANNEL 1 CONTROLLER JACK -
Connect
the supplied mini-plug from the CUE jack on the
rear of your CD unit to the CONTROL out jack of
a compatible American Audio
® or American DJ®
mixer. This will enable the CD "Q-Start" function.
This feature is only available on American Audio
®
or American DJ
® “Q” series mixers.
37. CHANNEL 2 REMOTE JACK
- Connect the
supplied 8 pin din cable from this jack to the play
-
er's channel 1 remote connector. This will allow
you to control the functions of player 2.
38. CHANNEL 2 CONTROLLER JACK -
Connect
the supplied mini-plug from the CUE jack on the
rear of your CD unit to the CONTROL out jack of
a compatible American Audio
® or American DJ®
mixer. This will enable the CD "Q-Start" function.
This feature is only available on American Audio
®
or American DJ
® “Q” series mixers.