


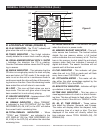

or Phase effect. See built-in effects on page 28.
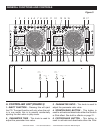
6. HOLD BUTTON - This button allows you to
set and lock any new parameters you set to the
effects. This button will glow bright blue when
the hold function is activated. If the hold function
is not selected any changes to the effect param-
eters will be momentary.
7. ECHO/FLANGER EFFECT - This button is
used to activate and deactivate either the ECHO
or FLANGER effect. See built-in effects on page
32.
8. TRANS/PAN EFFECT - This button is used to
activate and deactivate either the TRANS or PAN
effect. See built-in effects on page 33.
9. FX SELECT BUTTON - The effects are locat
-
ed on two different layers. This button allows you
to select an effect on a different layer.
10. TEMPO LOCK FUNCTION - This button
activates the TEMPO LOCK function. This func
-
tion allows you to use the PITCH SLIDER to
speed up or slow down playback speed without
altering the tonal pitch of the track. When this
function is not engaged the original tonal pitch
of the track will be altered giving you the "chip
-
munk" effect when a track is played at a high rate
of speed, or the "James Earl Jones" effect when
a track is slowed to much. To turn this function
off, press and hold down this button for at least
1 second and then release.
11. SEARCH - The search function has four for
-
ward and four reverse speed positions allowing
you to quickly scan through tracks. The more
you turn the wheel in either direction, the faster
your search.
12. TRACK BUTTON - This buttons is
used to select a track. Tapping this button will
back skip on track, holding down this button will
rapidly BACK SKIP through the tracks.
13. TRACK BUTTON - This buttons is
used to select a track. Tapping this button will
forward skip to the next track, holding down
this button will rapidly forward skip through the
tracks.
14. +10 TRACK SKIP - This button allows you
to skip ahead by 10 tracks. Example: if you are
at Track #1, pressing this button will skip you to
Track #11, press the button again, it will skip to
Track #21. If there are not that many tracks, it will
go back to Track #1.
15. REV/PLAY - This button activates reverse
play mode This function will play your track or
sample in reverse. All pitch and effect functions
will operate normally in this mode
16. BEAT BUTTON - Theses buttons are used
to set the delay time of an effect to the beat of
music. The corresponding L.E.D.s will indicate
which beat ratio is chosen. Choose an effect
delay time of 1/4, 1/2, 3/4, 1/1, 2/1, or 4/1.
17. PITCH ON/OFF BUTTON - This button is
used to turn the PITCH SLIDER (18)
function on
and off. This button will also change the pitch
percentage the
PITCH SLIDER (18) will react to.
The pitch percentage can be changed between
4%, 8%, 16% and 100%. 4% will allow the least
amount of pitch manipulation and 100% will
allow the most amount of pitch manipulation. To
adjust to the different values please see page
28. The L.E.D. of the PITCH ON/OFF BUTTON
will indicate which pitch percentage mode you
are in, glowing red for 4%, glowing red for 8%,
glowing blue for 16% or flashing blue for 100%.
Note when L.E.D. is not glowing in any color the
Pitch Function is not activated.
18. PITCH SLIDER - This slider is used to adjust
the playback pitch percentage. The slider is a
set adjustment and will remain set until the pitch
slider is moved or the pitch function has been
turned off. This adjustment can be made with
or without a disk in the drive. The pitch adjust
-
ment will remain even if a disc has been remove
and will reflect on any other disc loaded into the
player. That is to say, if you set a +2% pitch on
one disc, remove that disc and insert another,
that disc too will have a +2% pitch. The amount
of pitch being applied will be displayed in the
LCD (34).
19. TAP BUTTON - This button is used to override
and manually set a tracks BPM. Occasionally the
built-in BPM meter may not function as desired.
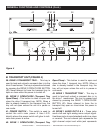
GENERAL FUNCTIONS AND CONTROLS (Cont.)
©American Audio® - www.americanaudio.us - DCD-PRO1000™ Instruction Manual Page 10