


43
HCD-C5
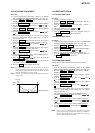
14. ERROR RATE CHECK
14-1. CD Error Rate Check
Procedure:
1. Load the check disc (TDYS-1).
2. Press the . “R” or > “R” button and display “CPLAY 1
MODE” (C34).
3. Press the ENTER/YES “R” button and display “CPLAY 1
MID”.
4. The display changes to “C = AD = )”.
5. Check that the C1 error rate is below 20.
6. Press the MENU/NO “R” button to stop playback, then press
the MD Z button and take out the check disc.
14-2. MO Error Rate Check
Procedure:
1. Load the continuously-recorded disc. (Refer to “5. USING THE
CONTINUOUSLY RECORDED DISC” (See page 37))
2. Press the . “R” or > “R” button to display “CPLAY 1
MODE” (C34).
3. Press the ENTER/YES “R” button to display “CPLAY 1MID”.
4. The display changes to “C1 = AD = )”.
5. If the C1 error rate is below 20, check that ADER is 00.
6. Press the MENU/NO “R” button to stop playback, then press
the MD Z button and take out the disc.
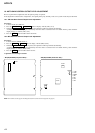
15. FOCUS BIAS CHECK
Change the focus bias and check the focus tolerance amount.
Procedure:
1. Load the continuously-recorded disc. (Refer to “5. USING
THE CONTINUOUSLY RECORDED DISC” (See page 37))
2. Press the . “R” or > “R” button to display “CPLAY 1
MODE” (C34).
3. Press the ENTER/YES “R” button twice to display “CPLAY
1 MID”.
4. Press the MENU/NO “R” button when “C1 =
AD =
)” is displayed.
5. Press the . “R” or > “R” button to display “FBIAS
CHECK” (C16).
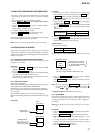
6. Press the ENTER/YES “R” button to display “ / c =
”.
The first four digits indicate the C1 error rate, the two digits
after “/ ” indicate ADER, and the 2 digits after “c =” indicate
the focus bias value.
Check that the C1 error is below 20 and ADER is below 2.
7. Press the ENTER/YES “R” button and display “ / b
= ”.
Check that the C1 error is about 100 and ADER is below 2.
8. Press the ENTER/YES “R” button and display “ / a
= ”.
Check that the C1 error is about 100 and ADER is below 2
9. Press the MENU/NO “R” button, then press the MD Z button
and take out the disc.
Note: If the C1 error and ADER are above other than the specified
value at points a (step 8. in the above) or b (step 7. in the above),
the focus bias adjustment may not have been carried out prop-
erly. Adjust from the beginning again.
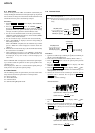
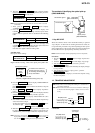
C1 error
about
220
B
CA
Focus bias value
13. FOCUS BIAS ADJUSTMENT
Procedure:
1. Load the continuously-recorded disc. (Refer to “5. USING
THE CONTINUOUSLY RECORDED DISC” (See page 37))
2. Press the . “R” or > “R” button to display “CPLAY 1
MODE” (C34).
3. Press the ENTER/YES “R” button to display “CPLAY 1MID”.
4. Press the MENU/NO “R” button when “C = = ” is
displayed.
5. Press the . “R” or > “R” button to display “FBIAS
ADJUST” (C09).
6. Press the ENTER/YES “R” button to display “ / a =
T”.
The first four digits indicate the C1 error rate, the two digits
after “/ ” indicate ADER, and the 2 digits after “a =” indicate
the focus bias value.
7. Press the > “R” button and find the focus bias value at
which the C1 error rate becomes about 220 (refer to Note 2).
8. Press the ENTER/YES “R” button to display “ / b =
T”.
9. Press the . “R” button and find the focus bias value at
which the C1 error rate becomes about 220.
10. Press the ENTER/YES “R” button to display “ / c =
T”.
11. Check that the C1 error rate is below 20 and ADER is 00. Then
press the ENTER/YES “R” button.
12. If the “( )” in “ - - ( )” is above 20, press the
ENTER/YES “R” button.
If below 20, press the MENU/NO “R” button and repeat the
adjustment from step 2.
13. Press thet MD Z button and take out the disc.
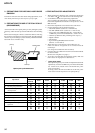
Note 1: The relation between the C1 error and focus bias is as shown in
the following figure. Find points A and B in the following figure
using the above adjustment. The focal point position C is auto-
matically calculated from points A and B.
Note 2: As the C1 error rate changes, perform the adjustment using the
average value.