


26
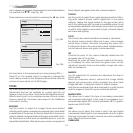
On entering the ‘Memories’ menu, a copy of the current settings
is saved in a temporary menu (labelled with
0 - AUTO
). Once
one or more memories have been recalled, you can restore
the settings that were effective at the moment the Memories
menu was accessed by selecting
0 - AUTO
. However, this opera-
tion must be completed before the ‘Memories’ menu page
disappears (30 seconds after the last operation commanded
from the remote control or the keypad). The next time it appears,
the temporary memory will contain new information that takes
into account any Memories selected the penultimate time the
‘Memories’ page was accessed.
Memory 0 (
- AUTO)
can be used even when you do not wish
to enable the Memories management function for the signal
currently in use. Once Memory 0 has been selected, when a
source is chosen, the settings that were effective at the time
the Memory was previously recalled will be automatically
applied.
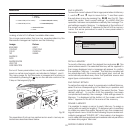
INFO
Displays the current status of the projector and information
concerning the projected video/graphic signal.
This function is displayed on pressing on the remote control
(or, in the absence of the On Screen Display, the Ë key on
the remote control).
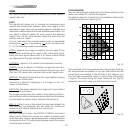
QUICK MENUS
The Quick menus allows the adjustment of most of the picture
quality controls without recalling the main On Screen menus.
Brightness, Contrast, Color, Tint, Sharpness and Filter adjustments
appear at the bottom of the screen, one after another, when
È/Í keys are pressed.
MESSAGES
The following messages could appear on your screen:
No Signal
The projector does not recognise any signal sent through the
selected input.
- Check that the selected input is actually connected to
a video or graphic signal.
- Verify compatibility of video/graphic signals with technical
specifications of your projector.
- Check the integrity of cables used to connect various
sources.
Out of range
Either the resolution or the horizontal/vertical frequency of the
input signal is too high.
- Input a signal that is within specifications.
10 CLEANING AND MAINTENANCE
The projector does not require internal cleaning. There are
no user serviceable parts inside the projector. Please refer all
service requirements to qualified personnel.
Cleaning the projector’s cover:
Use a soft slightly damp cloth. Do not use abrasive cleaners,
solvents or other harsh chemicals, as this will damage the
finish of the cover. Avoid direct cleaning of the rear panel’s
screen-printing.
Cleaning the lens:
The lens may be cleaned with a very soft, non-abrasive small
brush, in order to remove dust particles. Alternatively, use a soft
dry cleaning cloth (of the type used for camera lens cleaning)
to remove fingerprints and grease marks.