


22
SETUP
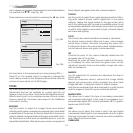
The setup menu contains less frequently used adjustments that
may be required during installation (e.g. On Screen Display
language selection or the display of Test Patterns).
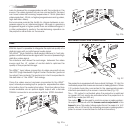
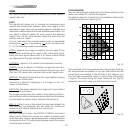
ORIENTATION
Select the option that best describes the installation i.e. desktop
front, ceiling front, desktop rear and ceiling rear..
DIGITAL
INPUT
AUDIO
OUT
ZOOM
CONTRO
L (RS 2
32)
GRA
PHICS R
GB
R/Cr
G/Y
B/Cb
HV
1
2
4
3
5
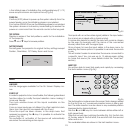
ATTENTION: pour ne pas compromettre
la protection contre les resque d'incende
remplacer par un fusible de meme type
et de mems caracteristique
CAUTION: for continued protection against
risk of fire, replace
only with same type
and rating fuse.
Fig. 31
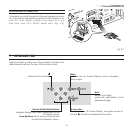
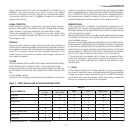
HORIZONTAL/VERTICAL KEYSTONE
To obtain maximum quality of the projected image, we re-
commend the installation of the projector on a level platform
parallel and central to the screen.
Adjust the feet underneath to obtain a level position, lining up
the base of the projected image to the base of the projection
screen (Fig. 32).
DIGITAL
INPUT
AUDIO
OUT
ZOOM
CONTROL (RS 232)
GRAPHICS RGB
R/Cr
G/Y
B/Cb
HV
1
2
4
3
5
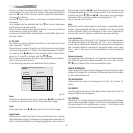
ATTENTION: pour ne pas compromettre
la protection contre les resque d'incende
remplacer par un fusible de meme type
et de mems caracteristique
CAUTION: for continued protection against
risk of fire, replace
only with same type
and rating fuse.
Fig. 32
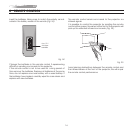
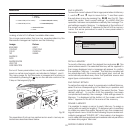
If the projected images needs to be centred horizontally, the
manual lens shift adjustment allows the projected image to
be moved vertically, up or down, in relation to the centre of
the screen; the maximum adjustment being equal to half the
height of the image in either direction (Fig. 33).
D
IG
IT
A
L
IN
P
U
T
A
U
D
IO
O
U
T
Z
O
O
M
C
O
N
T
R
O
L
(
R
S
2
3
2
)
G
R
A
P
H
I
C
S
R
G
B
R
/
C
r
G
/
Y
B
/
C
b
H
V
1
2
4
3
5
A
T
T
E
N
T
IO
N
:
p
o
u
r
n
e
p
a
s
c
o
m
p
r
o
m
e
tt
r
e
l
a
p
r
o
te
c
t
io
n
c
o
n
t
r
e
l
e
s
r
e
s
q
u
e
d
'
i
n
c
e
n
d
e
r
e
m
p
la
c
e
r
p
a
r
u
n
fu
s
ib
l
e
d
e
m
e
m
e
ty
p
e
e
t
d
e
m
e
m
s
c
a
r
a
c
t
e
r
i
s
tiq
u
e
C
A
U
T
I
O
N
:
f
o
r
c
o
n
t
i
n
u
e
d
p
r
o
t
e
c
t
i
o
n
a
g
a
i
n
s
t
r
i
s
k
o
f
f
i
r
e
,
r
e
p
l
a
c
e
o
n
l
y
w
i
t
h
s
a
m
e
t
y
p
e
a
n
d
r
a
t
i
n
g
f
u
s
e
.
Fig. 33
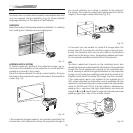
In the event you are unable to centre the image within the
screen area, tilt the projector until the image is correctly posi-
tioned. Any keystone error can be removed by the Keystone
adjustment in the Set up menu. The keystone adjustement helps
to compensate possible horizontal tilts of the projector.
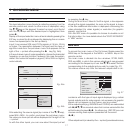
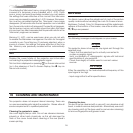
LENS
The Zoom adjustment impacts on the motorized zoom lens
allowing to increase or decrease the dimension of the projected
image. The Focus adjustment impacts on the motorized lens
focus, allowing to obtain the highest definition on the projected
image, an accurate focus setting should allow the viewer to di-
stinguish each pixel that create the image one from another.
If the video signal used is not suitable for this purpose,the HT
305 system provides two test pattern ,each available with the
ajustment mentioned above,in order to select the appropriate
value for ZOOM and FOCUS. This test pattern is displayed by
pressing the • key,once the right adjustments are reached
using the Á and Ë keys,the test image can be easly removed
pressing again the • key of the remote control.
F1
ZOOM
FOCUS
F2
ZOOM
ZOOM
ZOOM
ZOOM
FOCUS
FOCUS
FOCUS
ZOOM
FOCUS
DIGITAL
INPUT
AUDIO
OUT
ZOOM
CONTROL
(RS 2
32)
GRAPH
ICS RGB
R/Cr
G/Y
B/Cb
HV
1
2
4
3
5
ATTENTION: pour ne pas
compromettre la protection contre les
resque d'incende remplacer par un
fusible de meme type et de mems
caracteristique
CAUTION: for continued protection
against risk of fire, replace
only with same type
and rating fuse.
Fig. 34