Designing Audio Conferencing Systems
B - 9
installed. With the use of a microphone amplifier and powered loudspeaker,
it is a simple matter to have the customer listen to the audio quality and agree
that it is acceptable before additional work is performed. This will save costly
re-installation work. More often than not, once the conference room users hear
the resulting sound quality of ceiling microphones, they will allow tabletop
boundary microphones to be used in their rooms, or at the very least agree that
the microphones must be placed closer to the local participants.
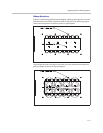
When using ceiling microphones, it is important to install the microphones
away from noise sources in the ceiling including HVAC, light fixtures,
projectors, loudspeakers, and any other noise source. If ceiling microphones
are the only option, it is better to hang the microphone from the ceiling as close
to the talkers rather than to have them flush-mounted if possible. While
aesthetically less appealing than a flush-mounted ceiling microphone, the
hanging microphone will move the microphone away from any ceiling noise
sources including the loudspeakers that will play the remote audio into the
local room and get the microphones closer to the talkers. If the ceiling
microphone is close to the ceiling (less than a foot from the ceiling), but not
flush mounted, the same boundary affect that improves the sensitivity of
flush-mounted microphones will cause multiple delayed signal paths to be
picked up by the microphone, unnecessarily degrading the overall audio
quality of the system. Ceiling microphones (hanging or flush mounted)
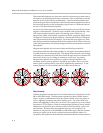
should have no more than a half-spherical pick up pattern. In typical
conference rooms with 9 foot high ceilings, it is common to hang the ceiling
microphones one or more feet from the ceiling over the conference table.
Again, the closer to the talker's mouths the better the system can sound.
When planning for how many ceiling microphones are required, keep in mind
that a ceiling microphone will cover approximately 100 sq. feet of room space.
This is dependent on the critical distance of the microphones. For instance,
rooms that have very high ceilings (defined as > 10 feet) should only use
ceiling microphones if it is possible to hang them several feet from the ceiling.
Automatic Microphone Mixers
As described elsewhere in this guide, the role of the automatic microphone
mixer is to limit the number of microphones that are open (or contributing
audio) at any given time to only the microphones associated with active
talkers. By reducing the number of microphones that are active, the local
speech that will be sent to the remote site will be less reverberant and less
noisy.
There is a significant reduction in audio quality if all the microphones are
active all the time versus being processed by the automatic microphone mixer.
This difference is particularly obvious when ceiling microphones are used due
to the high noise and reverberation levels associated with microphones that
are farther away from the local talkers and approaching greater than 50% of
the microphone's critical distance.


