


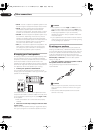

Other Settings
09
64
En
•
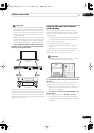
12V Trigger 1 / 2
– After connecting a component to
one of the 12 volt triggers (see
Switching components
on and off using the 12 volt trigger
on page 60), select
M. ROOM
,
ROOM2
,
ROOM3
or
OFF
for the
corresponding trigger setting to switch it on
automatically along with the (main or sub) room
specified.
•
PDP In (SR+)
– To control certain functions on this
receiver from a plasma display, select the display
input to which you’ve connected the receiver.
1
7 When you're finished, press RETURN.
You will return to the System Setup menu.
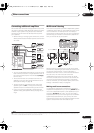
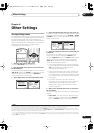
Input function default and possible settings
The terminals on the rear of the receiver generally
correspond to the name of one of the input source
functions. If you have connected components to this
receiver differently from (or in addition to) the defaults
below, see
The Input Setup menu
above to tell the
receiver how you’ve connected up. The dots (
ì
) indicate
possible assignments.
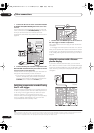
The Other Setup menu
The Other Setup menu is where you can make
customized settings to reflect how you are using the
receiver.
1 Switch on the receiver and your TV.
Use the
RECEIVER
button to switch on.
2 Press
RECEIVER
on the remote control, then press
the
SETUP
button.
An on-screen display (OSD) appears on your TV. Use the
///
buttons and
ENTER
to navigate through the
screens and select menu items. Press
RETURN
to
confirm and exit the current menu.
3 Select ‘Other Setup’ then press
ENTER
.
4 Select the setting you want to adjust.
If you are doing this for the first time, you may want to
adjust these settings in order:
•
Multi Room Setup
– Specify your volume setting for
a multi-room setup (see
Multi-Room Setup
below).
•
SR+ Setup
– Specify how you want to control your
Pioneer plasma display (see
SR+ Setup for Pioneer
plasma displays
below).
•
OSD Adjustment
– Adjust the position of the on-
screen display on your TV (see
OSD Adjustment
below).
•
iLINK Check
(
VSX-84TXSi only)
– Check which i.LINK-
equipped components you have connected, and
which input function they are assigned to (
Checking
the i.LINK inputs
on page 52).
5 Make the adjustments necessary for each setting,
pressing RETURN to confirm after each screen.
Note
1 You will have to make an SR+ cable connection from a
CONTROL OUT
jack on the display to the
CONTROL IN
jack on this receiver (opposite from the
setup in
Using this receiver with a Pioneer plasma display
on page 60). Note that to control this receiver using the remote, you will have to point it at the
plasma display’s remote sensor after making this connection.
Input
source
Input Terminals
Digital i.LINK HDMI
Component
S-Video
DVD/LD
COAX 1
ììì
IN 1
TV
ìììì
IN 2
SAT
OPT 1
ìììì
DVR/VCR1
OPT 2
ììì
(Fixed)
DVR/VCR2
OPT 3
ììì
(Fixed)
VIDEO/GAME1
ììììì
VIDEO/GAME2
(Fixed)
ì
(Fixed)
HDMI 1
ìì
(
HDMI-1
)
HDMI 2
ìì
(
HDMI-2
)
HDMI 3
ìì
(
HDMI-3
)
HDMI 4
(VSX-84TXSi )
ìì(
HDMI-4
)
USB
XM
CD
COAX 2
ì
CD-R/TAPE/MD
OPT 4
ì
TUNER
PHONO
MULTI CH IN
iPod
iLINK
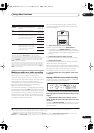
SLEEP
ANALOG
VIDEO
RECEIVER SOURCE
SYSTEM OFF
INPUT
SELECT
DVD SAT
VIDEO 1 T V CONT
DVR1 i Pod
TUNER
RECEIVER
CD
DVR2
CD-R
TV VIDEO 2
XM RADIO
ROOM2/3
+
10
DISC
CLASS
D.ACC ES S
ENTER
TV CONTROL
VOL
TUNE
TUNE
ST ST
TV CH
INPUT
SELECT
TV VOL
ENTER
AV PARAMETER
TOP MENU ì
DTV MENU
CH LEVEL
MENU
T.EDIT
BAND
GUIDE
RETURNRETURN
SETUPSETUP
CATEGORY
ì
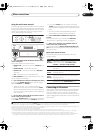
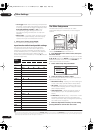
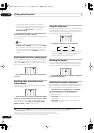
System Setup
1.Auto MCACC
2.Surr Back System
3.Manual MCACC
4.Data Management
5.Manual SP Setup
6.Input Setup
7.Other Setup
: Exit
7.Other Setup
:Return
a.Multi Room Setup
b.SR+ Setup
c.OSD Adjustment
d.i.LINK Check
VSX_84TXSi.book.fm 64 ページ 2006年3月13日 月曜日 午前11時54分