


21
Displays & Controls
PREPARATION
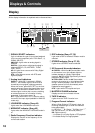
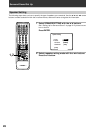
- INPUT SELECTOR dial
Turn to select a source component. The source
indicators show the current component:
DVD/LD : DVD player or Laser Disc player.
TV/SAT : TV tuner or satellite tuner.
CD : Compact Disc player.
MD/TAPE 1 : Tape deck or Mini Disc recorder
connected to MD/TAPE 1 inputs/outputs.
TUNER : The built-in tuner.
PHONO : Turntable.
VIDEO : Video camera (etc.) connected to the
VIDEO INPUT on the front panel.
VCR 1 : Video cassette recorder connected to
VCR 1 inputs.
VCR 2 : Video cassette recorder or other
component connected to VCR 2 inputs.
= MASTER VOLUME
Adjusts the overall receiver volume.
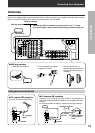
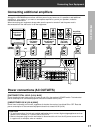
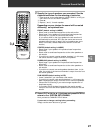
~ EXTERNAL DECODER IN (See p.43)
Use to hook up an external component that can
decode other types of signals and input them into
the VSX-D908S.
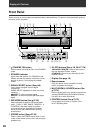
! DIRECT button
Switches DIRECT playback on or off. Use to
bypass the tone controls and channel level for the
most accurate reproduction of a program source.
It will automatically put the receiver in STEREO
mode for the function being used for DIRECT
playback.
@ LOUDNESS button (See p.44)
Switches the LOUDNESS mode on or off.
# MIDNIGHT button (See p.42)
Switches the MIDNIGHT LISTENING mode on or
off.
$ DIGITAL NR button (See p.41)
Switches the DIGITAL NR on or off (STEREO
mode only).
% FL DIMMER button (See p.45)
Use to adjust the brightness of the main display.
^ TUNER CONTROL button (See p.46-49)
CLASS : Press repeatedly to switch the preset
station classes.
FM/AM : Press to select the AM or FM band.
TUNING –/+ : Use to manually tune to radio
stations.
& STATION –/+ buttons (See p.48-49)
Use to choose programmed radio stations.
* MEMORY button (See p.48)
Press to start the memorization of a preset
station.
( MPX button (See p.46)
Press to switch between auto stereo and MONO
reception of FM broadcasts. When the broadcast
signal is weak, selecting MONO will improve the
sound quality.
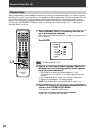
) TAPE 2 MONITOR button (See p.62)
Selects the tape deck (MD recorder, etc.)
connected to the TAPE 2 MOINTOR inputs/
outputs. Allows monitoring of a recording as it’s
being made.
_ INPUT ATT button
Use to lower the input level of an analog signal
that is too powerful, thus causing the receiver to
distort (the overload indicator will light furiously).
+ TREBLE (–/+) button (See p.44)
Use to adjust the high frequencies.
¡ BASS (–/+) button (See p.44)
Use to adjust low frequencies.
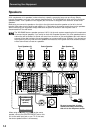
™ SPEAKERS (A/B) buttons
A is the primary setting. It plays all speakers
hooked up to the A system. A & B setting only
plays the front speakers and the sub-woofer,
multi channel sources will be down-mixed to
these speakers so no sound will be lost. B setting
only plays the front speakers connected to the B
system and multi channel sources will be down-
mixed to these two speakers.
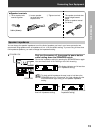
£ VIDEO INPUT jacks (See p.9)
S-VIDEO : Video input for connecting a video
camera (etc.), that has an S-Video out.
VIDEO / AUDIO (L/R) : Video input for
connecting a video camera, etc. that has standard
video/audio outputs.
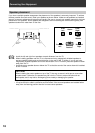
¢ PHONES jack
Connect headphones for private listening (no
sound will be heard through the speakers)
A A+B OFFB