


9
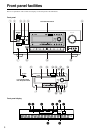
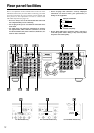
Front panel facilities
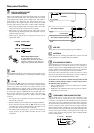
PHONES jack
This is a standard stereo jack for connecting stereo headphones.
The audio for the front right and left speakers are sent to the
headphone speakers. When the headphones are plugged in, the
listening mode automatically changes to stereo and output to the
speakers is stopped.
AUDIO SELECTOR button
This button is used to select the type of audio input signal. Each
time pressed, the setting cycles from “AUTO” → “Multichannel”
→ “Analog” and back.
AUTO (automatic detection): With this setting, the TX-DS787
automatically detects whether the input signal is digital or
analog. When a digital signal is not input, then the analog
signal is played.
Multichannel: Select this setting to play back the input from the
component connected to the MULTI CHANNEL INPUT port.
This setting is effective when the Multichannel setting in the
Audio Setup sub-menu is set to “Yes” (see page 35).
Analog: Select this setting to play back the input from a source
component connected to an AUDIO IN jack. With this setting,
even if a digital signal is input from the same component, only
the analog signal will be output.
Input Source Buttons (DVD, VIDEO 1–4,
TAPE, FM, AM, PHONO, and CD)
These buttons are used to select the input source for the main zone.
To select the input source for the remote zone (Zone 2) or
recording out (Rec Out), first press the Zone 2 or Rec Out button,
and then the desired input source button.
VIDEO 4/VIDEO CAM INPUT
These inputs are for connecting video cameras and other such
equipment.
RT/PTY/TP (European models only) button
This button is only available on European models. Use this button
to help tune into the Radio Data System (RDS) for FM
broadcasting. RDS was developed within the European
Broadcasting Union (EBU) and is available in most European
countries. Each time the button is pressed, the display changes
from RT (radio text) to PTY (program type) to TP (traffic
program) and then back to RT again.
DIMMER (other than European models)
button
Press to set the brightness of the front display. There are 3 settings
available: normal, dark, and very dark.
• The dimmer control for the front display can also be performed
at the remote controller.
Front display
Front panel
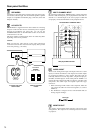
POWER switch
Turns on and off the main power supply for the TX-DS787.
• Before turning on the power, make sure all cables are properly
connected.
• Turning on the TX-DS787 may cause a momentary power
surge that might interfere with other electrical equipment on
the same circuit. If this is a problem, plug the TX-DS787 into a
different electrical circuit.
STANDBY indicator
Lights when the TX-DS787 is in the standby state and flashes
when a signal is received from the remote controller.
STANDBY/ON button
Pressing this button while the main power is turned on the
STANDBY indicator lights up and the front display turns off.
Pressing it again returns it to the standby state. This state turns off
the display, disables control functions.
ZONE 2 indicator
Lights when a signal is output to the remote zone (Zone 2). When
the ZONE 2 indicator is off, then either output to the remote zone
is turned off or Rec Out is selected.
REC OUT/ZONE 2 buttons
These buttons allow you to use the TX-DS787 to output to a
remote zone (Zone 2) or to another component for recording
purposes (Rec Out). Press the REC OUT button to output the audio
and video signals to a recording component for recording
purposes. Press the ZONE 2 button to enjoy the output from the
TX-DS787 in a different room, which is referred to as a remote
zone (Zone 2).
When either button is pressed, the currently selected input source
for recording or outputting to the remote zone is displayed in the
front panel display. If “SOURCE” is displayed, then the same
input source as that selected for the main zone will be output.
To select an input source, press the desired button (REC OUT or
ZONE 2) and then press one of the input source button within 3
seconds. That source will be output for recording or viewing in the
remote zone. To turn off either the REC OUT or ZONE 2 output,
when “SOURCE” is displayed, press the button again. “OFF”
appears in the front display.
Notes:
• The Rec Out and Zone 2 buttons use the same circuit and
therefore cannot be used at the same time. When Rec Out is
selected, nothing is output to Zone 2, and vice versa.
• When not using Rec Out or Zone 2, turn off the signal. If
turned on and the connected component is not turned on, the
electric signal will still be sent through the circuitry and the
excess load may cause deterioration of the audio signal.
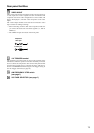
MASTER VOLUME dial
The MASTER VOLUME dial is used to control the volume for the
main zone. The volume for the remote zone (Zone 2) is
independent.