


English
— 42 —
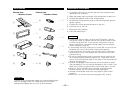
Installation
• Be sure to press the reset button after installation.
• During installation, do not use any screws except for those
provided. The use of different screws might result in damage
to the main unit.
• Damage may occur if a screwdriver or similar tool is used
with excessive force during the installations.
• When performing a check of the CD operation prior to
installation, place this unit in a hirizontal position and perform
a loading/eject of the CD.
• This installation method is a reference example.
• Make sure that the unit is installed securely in place. If the
unit is unstable, it may malfunction (for example, the sound
may skip).
NOTE
2CAUTION
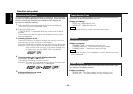
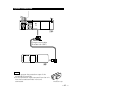
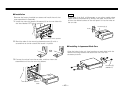
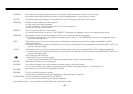
Assembly
■
Fit the projections on both
sides of the Accessories 4
into the slits on the
Accessory2.
Accessory 2
Accessory5
(M5 × 6 mm)
Accessories5 should be screwed in firmly.
If it is not properly secured, it may rub against
the mounting sleeve when the unit is removed,
making itself impossible to remove.
NOTE
Accessory2
Accessory 4
Accessory 6
Accessory 7
(Used when there
are rubber bushes on
the rear panel of the
radio.)
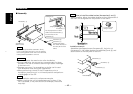
Installation example
Assemble the stepped screw (Accessory6), the joint nut
(Accessory7), the rubber bushes (Accessories8 and 9), and
secure them to the rear panel of the unit.
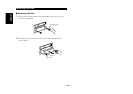
Cut off the end
using a cutter.
How to install the rubber bushes (Accessories8 and 9)
When installing, adjust the rubber bushes so that the position of
the main unit is aligned with the position of the radio.
NOTE
Accessory 6
Accessory 9
Accessory 7
Accessory 8