


— 10 —
English
General features
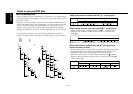
Adjust the clock.
Press the CLK button to select the clock mode.
Once the clock mode is selected, "CLOCK" will be displayed.
Adjusting the Clock:
Press the ADJ button for at least two seconds.
"CLOCK ADJ" is displayed, and then you can adjust the time.
You can adjust hours with the FM/AM button, and minutes with
the 4/¢ button.
To set the minute to "00"
Press the S/S button for at least one second to set the minute to
"00".
Pressing this button while the minute is below "30" rounds it off,
and while the minute is "30" or more rounds it up.
Press the CLK button to end the clock adjustment.
Adjusting the minute restarts the second counter from 00.
4
NOTE
3
2
1
Clock Adjustment
This function amplifies low and high tones when the volume is
turned down.
The LOUD indicator lights up when the loudness function is on.
Turning Loudness On/Off:
Press the LOUD button for at least one second to switch the
loudness on and off.
Loudness
Increasing Volume:
Press the u button to turn up the volume.
Decreasing Volume:
Press the d button to turn down the volume.
Volume
• When the front panel has been slid, it might interfere with the
shift lever or something else. If this happens, pay attention to
safety and move the shift lever or take an appropriate action,
then operate the unit.
• Do not apply excessive force to the front panel after it slides.
Protect function for the panel
The panel may move due to the protection mechanism, if any
buttons are pressed with excessive force while the panel angle is
adjusted to the slide position.
NOTE
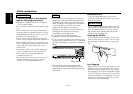
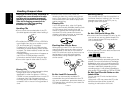
You can adjust the front panel angle for easy viewing.
Sliding the panel:
Each time you press the ANG button for at least one second,
the front panel will slide to three positions step by step.
If the power is turned off, the front panel will close automatically.
When you turn the power back on, the panel angle will return to
the adjusted angle position.
Closing the panel:
Press the ANG button for at least one second repeatedly until
the front panel closes.
• Take care that your fingers and so on do not get caught during
the slide operation of the front panel.
2CAUTION
NOTE
Panel Angle Adjustment