


10
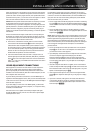
REAR-PANEL CONNECTIONS
P
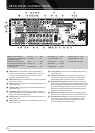
Video 1 Video Outputs:
Connect these jacks to the RECORD/INPUT
composite or S-Video jack on a VCR.
Q
Video 1 Video Inputs:
Connect these jacks to the PLAY/OUT
composite or S-Video jacks on a TV or other video source.
R
Optical Digital Inputs:
Connect the optical digital output from a
DVD player, HDTV receiver, the output of a compatible computer sound
card playing MP3 files or streams, LD player, MD player or CD player to
these jacks. The signal may be either a Dolby Digital signal, a DTS signal,
a 2 channel MPEG 1 signal, or a standard PCM digital source.
S
Analog 4 Audio Inputs:
Connect these jacks to the PLAY/OUT
audio jacks on a TV or other audio or video source.
T
Video 2 Video Inputs:
Connect these jacks to the PLAY/OUT
composite or S-Video jacks on a second VCR or other video source.
U
Remote Input and Output:
If the AVR’s front-panel IR sensor is
blocked due to cabinet doors or other obstructions, an external IR sensor
may be used. Connect the output of the sensor to the Remote IN jack.
The Output connection permits the IR sensor in the receiver to serve
other remote controlled devices. Connect this jack to the “IR IN” jack on
Harman Kardon or other compatible equipment.
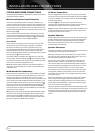
V
Zone 2 IR Input:
Connect the output of an IR sensor in a remote
room to this jack to operate the AVR’s multiroom control system.
W
Preamp Outputs:
Connect these jacks to an optional, external
power amplifier for applications where higher power is desired.
X
HDMI Output:
Connect this jack to the HDMI input on a compatible
HDMI-equipped video display.
Y
Video 3 Video Inputs:
Connect these jacks to the PLAY/OUT
composite or S-Video jacks on any video source.
Z
Analog 3 Audio Inputs:
Connect these jacks to the PLAY/OUT
audio jacks on any audio or video source.
a
HDMI Inputs:
Connect the HDMI output of video sources such as a
DVD player, set-top box or HDTV tuner to either of these jacks.
b
Main Power Switch:
Press this button ON to apply power to the
AVR. When the switch is ON, the unit is placed in a Standby mode, as
indicated by the amber LED
2
. This button MUST be ON to operate
the unit. To turn the unit off completely and prevent the use of the
remote control, this switch should be pressed OFF.
NOTE:
This switch is
normally left in the “ON” position.
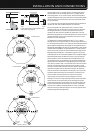
With the AVR’s powerful processor, you may connect up to three
HDMI-equipped source devices to the HDMI inputs using a single-cable
connection, while benefiting from superior digital audio and video
performance. However, if your video display is not HDMI-compatible, you
will need to connect the source device to one of the other source inputs,
selecting a coaxial or optical digital audio input and analog video input.
See the Connections and Installation sections for more information.
If your video display has an HDMI input, but some of your sources have only
analog video outputs, you may still rely on just the HDMI video connection
to your display; the AVR will automatically transcode analog video signals
to the HDMI format.
NOTE ON VIDEO CONNECTIONS:
When connecting a video source
product such as a VCR, DVD player, satellite receiver, cable set-top box,
personal video recorder or video game to the AVR 260, you may use either a
composite or S-video connection, but not both.