


setting switch SW1 to position #4 to the “ON” posi-
tion for 5 seconds with the power “ON”.
B. Recording a Message for Broadcast.
When the line attached to the Router is
called, the Router will answer with the message
“ENTER PASSWORD”. Enter your 8 digit password.
Then the caller will hear the message
“PRESS 9 KEY TO CHANGE THE PASSWORD OR
6 KEY TO RECORD A MESSAGE”.
Press the 6 key, the message “RECORD
MESSAGE, PRESS # KEY TO BROADCAST YOUR
MESSAGE” prompts the caller to start speaking. Say
your message into the phone. Press [#] and hang up
the phone. Your message will be sent to all zones
connected to the Audio Router Device. The message
can be up to 90 seconds long. If the user exceeds 90
second duration, the message will not play back. This
is the procedure for selecting “All Call”.
C. Abort a Message Without Sending it
Anywhere.
Hang up at any time without pressing [#].
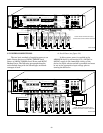
D. Send Your Message to a Specific Selected Zone
or Zones.
After saying the message, press any keys on
the telephone keypad from 1-8. These correspond to
the eight zones which are connected to the master
AR2000-M unit. Pressing [1] will select Zone 1,
pressing [5] will select Zone 5 and pressing [8] will
select Zone 8.
For example: To send a message to only Zone
3 of the AR2000-M, after recording the message key
in [3] and then press the [#] key. The message will be
sent only to Zone 3.
For example: To send a message to Zone 3
and Zone 4 of the AR2000-M, after recording the
message key in [3], key in [4] and then press the [#]
key. The message will be sent to Zone 3 and to Zone
4.
If additional AR2000-Z units are connected,
those Zones may also be individually selected. To
accomplish this first key in [*], then key in the bank
number which is associated with the additional zones
you desire to reference (2 –8) and then key in a Zone
for that bank. A maximum of seven (7) additional
Zone Banks may be added to the AR2000-M device.
The master unit is designated as Bank 1.
For example: Keying in [*], [1], [2] will select
to send your message to zone 2 of Bank 1 (located in
the master unit). The [*] says you are about to select
a Bank number and Zone. To send the message to
Bank 1 Zones 1, 4, and 6, after recording a message
key in [*], [1], [1], [4], [6], [# ] and hang up. The
message will be sent to Zones 1, 4 and 6 of the Master
unit (Bank 1).
For example: If there is one AR2000-Z unit
connected to the AR2000-M, then it is on Bank 2. To
send a message to only Zone 4 of the AR2000-Z in
Bank 2, key in the following after recording a mes-
sage: key in [*], [2], [4], and then press the [#] key
and hang up. The message will be sent only to Zone 4
of Bank 2.
For example: If there are two AR2000-Z units
connected to the AR2000-M, then they are on Bank 2
and on Bank 3. To send a message to Zone 4 of the
AR2000-Z in Bank 2 and Zone 5 of the AR2000-Z in
Bank 3, key in the following after recording a mes-
sage: key in [*], [2], [4] and key in [*], [3], [5] and then
press the [#] key and hang up. The message will be
sent to Zone 4 of Bank 2 and Zone 5 of Bank 3.
For example: To send a message to Zone 6
from Bank 8 after recording a message, key in [*], [8],
[6] and then press the [#] key and hang up. The
message will be sent to Zone 6 of Bank 8.
For example: To select Zones 1,3,5 from Bank
2 and Zones 1, 2 from Bank 3, key in the following
after recording a message: key in [*], [2 ], [1], [3], [5],
[*], [3], [1], [2], [#] and hang up. The message will be
sent to Zones 1, 3 and 5 of Bank 2 and Zones 1 and 2
of Bank 3.
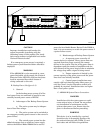
E. Send Your Message to a Selected Preset.
After recording a message, first key in [0 ],
then the associated Bank number(1-8) and then the
Preset number of that Bank (1-8). The zero indicates
you are about to select a preset Bank and preset
number. Only one preset may be selected for a
message.
If additional AR2000-P units are connected,
those Presets may also be individually selected. To
accomplish this, first key in [0], then key in the Bank
number which is associated with the additional
Preset you desire to reference (2 –8) and then key in
a Preset for that bank. A maximum of seven (7)
additional Preset Banks may be added to the
AR2000-M device. The master unit is designated as
Bank 1.
To select preset 2 from Bank 2 after recording
a message, key in [0], [2], [2] and then press the [#]
key and hang up. The message will be sent to Preset
2 of Bank 2.
To select Preset 3 from Bank 8 after record-
ing a message, key in [0], [8], [3] and then press the
[#] key and hang up. The message will be sent to
Preset 3 of Bank 8.
-16-