


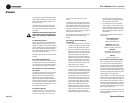


ZONE 1
PRESET 1
CH B
CH A
MICROPHONE
AUX SPEAKER
PHONE
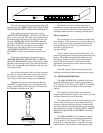
AR2000-M
ALL CANCEL
ALL CALL
CORPORATION
UNIVERSITY PARK, IL U.S.A.
R
FEDERAL
SIGNAL
PRESET 7PRESET 4
ZONE 4ZONE 2 ZONE 3
PRESET 2 PRESET 3
ZONE 5 ZONE 6 ZONE 7
PRESET 6PRESET 5
POWER
ZONE 8
ALARM
PRESET 8
290A4120-01
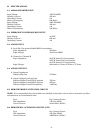
Figure 1-1.
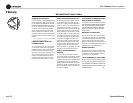
ZONE 2
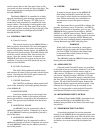
AR2000-Z
UNIVERSITY PARK, IL U.S.A.
CORPORATION
FEDERAL
SIGNAL
R
ZONE 1 ZONE 5ZONE 4ZONE 3 ZONE 7ZONE 6 ZONE 8
POWER
290A4120-02
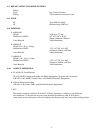
Figure 1-2.
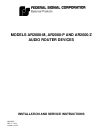
Selectone amplified speakers. A Model AM25CK or
AM70CK Connector Kit is required in each Selectone
device to connect it to the signal line. The Audio
Router device supplies 15W at either 25Vrms or
70Vrms. An additional amplifier must be supplied to
obtain higher wattage levels. Care must be taken to
ensure that the total line impedance of all the con-
nected devices does not cause the line voltage to drop.
Each preset can be manually activated locally
with its associated push button switch on the front
panel or with a contact closure at the associated
preset control input on the back panel. Whenever a
preset is activated, either locally or remotely, its
associated front panel push button LED illuminates
to indicate that the preset has been activated. The
LED remains lit until the preset is deactivated or the
remote contact closure is removed. As an added
feature, when a preset is remotely activated, the
associated LED illuminates and flashes until the
remote contact closure is removed. All AR2000-M
controls are located on the front panel except gain
adjustments which are made on the back panel
during installation.
Operation (normal mode)
Pressing the Channel A or Channel B button
will immediately switch the input to that channel;
the speaker indicator lights will indicate what
speakers are connected. Pushing a speaker button
will turn that speaker on or off; pushing a preset
button will select speakers per that preset, and may
also select Channel A or B (if that preset was config-
ured for a specific channel). Keying the microphone
while in this mode will cause the microphone signal
to be sent to the selected speakers; releasing the
microphone will allow Channel A or B operation to
resume.
Keying the Microphone button will allow the
user to direct audio to specific zones (default is All-
Call). The user may select zones using either indi-
vidual speaker or preset buttons; Channel A or B
operation will not be interrupted until the micro-
phone is actually keyed. Releasing the microphone
will allow Channel A or B to resume operation on its
selected speakers.
Pressing the All Call button (whether the unit is
in Microphone mode or Channel A/B mode) will cause
all zones to be selected. Pressing any individual zone
when All Call is lit, however, will cancel all the zones
except that one.
Pressing All Call will perform the following
function:
If all of the zones are not selected, “All Call” will
select all 64 zones. Otherwise, pressing “All Call” will
cancel all of the zones.
Telephone operation
When the line attached to the Router is called,
the router will answer with the Message “ENTER
PASSWORD”. The caller is required to enter their 8
digit password. The caller is given 2 chances to enter
the correct password.
If the correct password is not entered, the caller
hears the message “GOODBYE” and the system
hangs up the phone line.
-2-