


24-EN
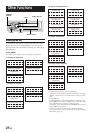
Adjusting and Storing the Crossover
Settings
Before performing the following procedures, refer to “About the
Crossover” (Page 23).
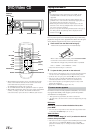
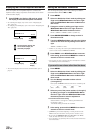
1
Press and hold MENU for at least 2 seconds.
2
Select the Crossover mode by sliding your finger
on the GlideTouch bar to the left or right. Press
the GlideTouch bar under the Crossover mode.
2 WAY System
3
Press BAND to select the band to be adjusted.
SUBW → REAR → FRONT → SUBW
4
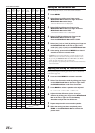
Select the desired cut-off frequency (Crossover
Point) by sliding your finger on the GlideTouch
bar to the left or right.
Adjustable frequency bands: 20Hz to 200Hz
(in 1/3 octave steps)
5
Press SOURCE/POWER to adjust the slope.
Adjustable slope: FLAT, 6dB/oct., 12dB/oct.,
18dB/oct., 24dB/oct.
6
Adjust the output level by turning the Rotary
encoder.
Adjustable output level: -12 to 0 dB.
7
To adjust another band, repeat steps 3 to 6, then
adjust all bands.
8
When the setting has been completed, press
FUNC. or the GlideTouch bar to activate the
preset mode.
9
Select any one of the preset numbers (1 through 6)
by sliding your finger on the GlideTouch bar to
the left or right. Press and hold the GlideTouch
bar under the desired preset for at least 2 seconds.
The adjustments are saved in the selected preset.
10
After setting, press and hold MENU for at least 2
seconds to return to normal mode.
• If MENU is pressed while adjusting or setting the items in the
MENU mode, the unit returns to the previous selection screen.
• By pressing the GlideTouch bar under RETURN in the MENU
mode, the unit will return to the normal mode.
• If no operation is performed for 60 seconds, the unit will return to
the normal mode.
3 WAY System
3
Press BAND to select the band to be adjusted.
LOW → MID-L → MID-H → HIGH → LOW
4
Select the desired cut-off frequency (Crossover
Point) by sliding your finger on the GlideTouch
bar to the left or right.
Adjustable frequency bands:
LOW: 20Hz to 200Hz (in 1/3 octave steps)
MID-L: 20Hz to 200Hz (in 1/3 octave steps)
MID-H: 1kHz to 20kHz (in 1/3 octave steps)
HIGH: 1kHz to 20kHz (in 1/3 octave steps)
5
Press SOURCE/POWER to adjust the slope.
Adjustable slope: FLAT*, 6dB/oct., 12dB/oct.,
18dB/oct., 24dB/oct.
* FLAT can be set for the HIGH slope only when USER'S
is selected in “Setting the Response Slope for the High
Range Speaker” (page 38). Depending on the response
characteristics of the speaker, care should be taken
when setting the response slope to FLAT, as speaker
damage may result. With the DVA-9965E, a message is
displayed when the response slope for the high range
speaker is set to FLAT. After the message is displayed,
press the Rotary encoder to set to FLAT.
6
Adjust the output level by turning the Rotary
encoder.
Adjustable output level: -12 to 0 dB.
7
To adjust another band, repeat steps 3 to 6, then
adjust all bands.
8
When the setting has been completed, press
FUNC. or the GlideTouch bar to activate the
preset mode.
9
Select any one of the preset numbers (1 through 6)
by sliding your finger on the GlideTouch bar to
the left or right. Press and hold the GlideTouch
bar under the desired preset for at least 2 seconds.
The adjustments are saved in the selected preset.
10
After setting, press and hold MENU for at least 2
seconds to return to normal mode.
• If MENU is pressed while adjusting or setting the items in the
MENU mode, the unit returns to the previous selection screen.
• By pressing the GlideTouch bar under RETURN in the MENU
mode, the unit will return to the normal mode.
• If no operation is performed for 60 seconds, the unit will return to
the normal mode.
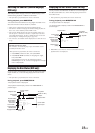
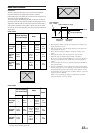
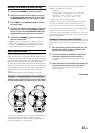
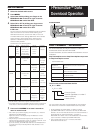
• About the 2way/3way system
You can switch to 2way/3way system mode with the 2way/3way
switch on the bottom side of the unit (page 65, 66 and 68).
When setting to “3 WAY”:
The unit can be operated in a 3 way system.
When setting to “F/R/Sub-W”:
The unit can be operated in a 2 way system.
F/R/Sub-W
3WAY