


3 Basics of Equalization
When a hot line level signal comes in, the DEQ830 has plenty of
headroom to deal with it. But if you perform some radical
equalization on this signal, it is possible that the combination of
the incoming hot signal plus the equalization you have done may
put the signal “over the top” and within clipping range. The
Master Level function allows you to reduce the level of the
equalized signal before it reaches the final output stage of the
DEQ830.
Don’t confuse this with the Channel Level settings in Edit mode.
The Channel Level settings are stored with the program, and
therefore may vary from program to program. The Master Level
setting is global; i.e., it is always active and will affect every
program. There is a diagram on page 32 that illustrates the
relationship between Channel Level and Master Level.
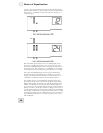
To lower or raise the Master Level setting, use the [VALUE]
encoder.
To lower or raise the Master Level setting, use the [VALUE]
encoder.
For an explanation of how to use the Channel Level control
feature, see page 32.
For an explanation of how to use the Channel Level control
feature, see page 32.
Release Edit Group (On/Off) Release Edit Group (On/Off)
Of all the Utility mode features, this is the one that will most
affect the way you work with the DEQ830. The Release Edit
Group setting determines the behavior of the [BAND SELECT]
buttons in Edit mode.
Of all the Utility mode features, this is the one that will most
affect the way you work with the DEQ830. The Release Edit
Group setting determines the behavior of the [BAND SELECT]
buttons in Edit mode.
I
f you are likely to edit only
one or two bands at a time
when constructing a new
curve, set the Release Edit
Group function to On. This
will enable you to move more
quickly across the audio
spectrum.
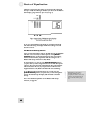
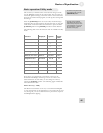
For the sake of describing this feature, let’s review some things we
already know. When you press a [BAND SELECT] button, you
enter Edit mode. If you don’t turn the [VALUE] encoder right
away, you can keep pressing [BAND SELECT] buttons until you
have several of them selected simultaneously. This is called
selecting an Edit Group.
Once you have selected an Edit Group, you can cut or boost the
gain of all of the bands in the Edit Group simultaneously; they
will move up or down together. The Release Edit Group feature
does not affect these things; this is always how the DEQ830
operates.
Once you have selected an Edit Group, you can cut or boost the
gain of all of the bands in the Edit Group simultaneously; they
will move up or down together. The Release Edit Group feature
does not affect these things; this is always how the DEQ830
operates.
However, once you make an edit, the Release Edit Group feature
comes into play. If it is set to “On,” the very next [BAND
SELECT] button you press will “release” all of the previously
selected bands. The only band that will be selected is the one you
just pressed. You will know this happened, because only that
band’s Gain LED will be blinking.
If the Release Edit Group feature is set to “Off,” the next
[BAND SELECT] button you press after you have changed the
level of the Edit Group will simply add that band to the Edit
Group. The upside of this is the convenience of being able to
boost three frequencies +3 dB, for example, and then add another
frequency to the pile and boost them all another +2 dB without
having to reselect the first three. The downside is that you will
have to deselect all four bands if you want to grab one more
frequency and edit it by itself.
46 46